










If you’ve managed traffic in Kubernetes, you’ve likely navigated the world of Ingress controllers. For years, Ingress has been the standard way of getting our HTTP/S services exposed. But let’s be honest, it often felt like a compromise. We wrestled with controller-specific annotations to unlock critical features, blurred the lines between infrastructure and application concerns, and sometimes wished for richer protocol support or a more standardized approach. This “pile of vendor annotations,” while functional, highlighted the limitations of a standard that struggled to keep pace with the complex demands of modern, multi-team environments. The Ingress model was stretched well beyond what it was originally designed for, and over time that led to portability issues, inconsistent behaviour, and real security vulnerabilities.
Ingress NGINX Retirement: Why This Matters Now
The Kubernetes Security Response Committee recently announced the retirement of Ingress NGINX, with support ending in March 2026. This decision reinforces the exact challenges the community has been raising for years. The same flexibility that made it popular early on, especially features like snippet-based configuration, became a major source of technical debt, vendor lockin and security exposure.
After the retirement date, Ingress NGINX will no longer receive security updates or bug fixes. Running it past that point exposes clusters to unpatchable edge risks. For anyone operating production workloads, the direction is clear. Kubernetes ingress movement is going toward a standard, vendor neutral, secure-by-default model called Gateway API that is easier to operate and maintain.
A Practical Path Forward: Gateway API with Calico
Calico Ingress Gateway, which offers a straightforward and future-proof migration path provides a fully compliant Gateway API implementation backed by Envoy, which gives teams a clean separation of responsibilities, predictable routing behavior, and a security model that avoids the pitfalls that led to the retirement of the NGINX controller.
Instead of relying on annotation workarounds, teams get a consistent API, built-in protocol support, and a platform aligned with how Kubernetes traffic management is evolving.
Bottom line: the move to a Gateway API-based traffic stack is the natural evolution away from legacy annotation sprawl and toward a more secure and maintainable future.
Connecting the Dots: How We Got Into the Ingress Rut
This brings us back to the root of the issue. The retirement of Ingress NGINX is not an isolated event. It is the culmination of long-standing strain on the Ingress model itself. The Ingress controller ecosystem has always been a mix of vendors bringing their own ideas to the table. They all handle basic HTTP and HTTPS, but the moment you need support for additional protocols or more advanced routing, you are stuck with whatever your chosen vendor implements. And if you ever try to switch controllers, you quickly run into the reality of vendor lock-in. Just look at your Ingress resources. Most of them rely on annotations that only work with the controller you are currently using.
That pile of annotations might get the job done, but it also shows the limits of Ingress as a standard. It forces teams to stretch the model in ways it was never meant to support, and over time this leads to portability issues and even security problems.
Wait a second, is this the ‘Ingress vs. Gateway API’ debate?
Yes, and it’s a crucial one. The Kubernetes Gateway API isn’t just an Ingress v2; it’s a fundamental redesign, the “future” of Kubernetes ingress, built by the community to address these very challenges head-on.
What makes Gateway API different?
There are three main points that I came across while evaluating GatewayAPI and Ingress controllers:
- Standardization & Portability: It aims to provide a core, standard way to manage ingress, reducing reliance on vendor-specific hacks and making it easier to switch implementations – change the class, and it should “just work.”
- Role-Based Architecture: Its biggest win is arguably the separation of concerns. Infrastructure teams can manage the Gateway (the entry point, TLS, ports), while application teams manage their HTTPRoutes (or TCPRoutes, etc.), defining where their specific traffic should go. This mirrors how modern, segmented organizations operate.
- Richer Features: It natively supports more protocols and offers a standard way to implement advanced routing, traffic splitting, and filtering, features that often require non-standard solutions with Ingress.
The Ingress Rut
The Ingress controller landscape is a mishmash of vendors with cool ideas. While they all can route HTTP/S traffic into your cluster, expanding your services to include other protocols puts you at the mercy of that vendor and the capabilities that they implement. On top of that, if you try to migrate from your old Ingress Controller to a new one at some point, there is that sweet conversation of vendor lock-in which ties your hands. If you are wondering how vendor lock-in plays a role here, then take a closer look at your Ingress resources, don’t they all share some sort of annotation?
That “pile of vendor annotations,” while functional, is specific to that one great solution you are currently using, highlighting the limitations of a standard that struggled to keep pace and even led to security vulnerabilities.
The purpose of this blog post
While Ingress isn’t disappearing tomorrow, the direction is clear. The Gateway API offers a path to a more robust, secure, and manageable ingress strategy. And now, with Calico v3.30, we’re introducing the Calico Ingress Gateway, a powerful, Envoy-based implementation of this next-generation standard at your fingertip.
Step-by-Step Guide: Deploying Calico Ingress Gateway with Gateway API
This post will guide you through making the leap. We’ll set up the Calico Ingress Gateway, demonstrate its core concepts in action, and crucially, show you how to effortlessly secure your applications with automated TLS certificates and enforced HTTPS, leaving those annotation struggles behind. Let’s build the future of Kubernetes ingress, together.
This guide walks you through setting up a Kubernetes demo environment using Calico, Gateway API, and a sample application. Each step includes clear commands you can copy and paste.
Prerequisites
Before we start, make sure you have:
eksctlinstalled- A Kubernetes environment with load balancer support (we used EKS for this example)
- Calico, v3.30.0 or later
- A valid domain for SSL (an alternative is provided in the next section)
- A browser to verify the deployment
1️⃣ Spin up a Kubernetes Cluster
We need a running Kubernetes environment to deploy Calico, our application, and the Gateway API resources which happens in this step. For this guide we used EKS for our example since we wanted to tie the GatewayAPI resources to an actual domain and a valid certificate to emphasize its application in a real world scenario. However, If you don’t have access to any cloud providers don’t worry!
Just follow this link to set up a local environment with self-signed certificates.
Create an EKS cluster using eksctl:
eksctl create cluster --name my-calico-cluster2️⃣ Install Calico Using the Tigera Operator
The Tigera Operator manages Calico lifecycle, which simplifies the process of installing, upgrading, and configuring Calico and your Cluster networking.
- Apply the CRDs and the operator:
kubectl create -f https://raw.githubusercontent.com/projectcalico/calico/v3.30.0/manifests/operator-crds.yaml kubectl create -f https://raw.githubusercontent.com/projectcalico/calico/v3.30.0/manifests/tigera-operator.yaml - Use the following command to verify the operator installation:
kubectl rollout status -n tigera-operator deployment/tigera-operator - Apply an Installation Custom Resource (CR) to configure Calico for our specific EKS environment. This CR defines how Calico should be deployed. For EKS, we specify the AmazonVPC CNI plugin and explicitly disable BGP, since networking is handled by the underlying AWS infrastructure. Use the following command to instruct the operator on how to install Calico in our environment:
kubectl create -f - <<EOF
kind: Installation
apiVersion: operator.tigera.io/v1
metadata:
 name: default
spec:
 kubeletVolumePluginPath: None
 kubernetesProvider: EKS
 cni:
   type: AmazonVPC
 calicoNetwork:
   bgp: Disabled
EOF
Note: To use Calico eBPF data plane, check out this documentation.
The setup process starts with applying the Custom Resource Definitions (CRDs) required by the Tigera Operator, followed by deploying the operator itself. Once the operator is running, the Installation CR tells it how to tailor Calico to the environment ensuring it integrates smoothly with the EKS network.
- Use the following command to verify the installation:
kubectl get tigerastatusExpected output:
NAME         AVAILABLE   PROGRESSING   DEGRADED   SINCE
calico       True        False         False      4d10h
ippools      True        False         False      4d10h
3️⃣ Deploy the Demo Application
To demonstrate the capabilities of the Gateway API and the Calico Ingress Gateway, we deploy Google’s “Online Boutique”, a popular microservices demo application. This application provides a realistic, multi-service architecture with a user-facing frontend ideal for showcasing traffic management and security.
- We deploy it using the following command, which pulls the Kubernetes manifests directly from the official GitHub repository and creates the necessary Deployments and Services:
kubectl create -f https://raw.githubusercontent.com/GoogleCloudPlatform/microservices-demo/refs/heads/release/v0.10.2/release/kubernetes-manifests.yaml - Once deployed, verify the status of the frontend deployment and identify the associated ClusterIP service:
kubectl rollout status deployment/frontend - Verify the services by using the following command:
kubectl get svc | egrep frontendExpected output:
frontend                ClusterIP      10.100.42.132    <none>                                                                   80/TCP         5d19h
frontend-external       LoadBalancer   10.100.43.33     a78ef864683d543e59c7d91fba812176-247554297.us-west-2.elb.amazonaws.com   80:30816/TCP   5d19h
Important: At this point we can agree that our application is now successfully deployed and our customers can access it using the DNS name that is provided by the load balancer. However, this traffic is unencrypted, which highlights the key security gap we’re aiming to address.
In the next steps we are going to use Calico Ingress Gateway to equip our application with SSL and run it in HTTPS without changing our application, or server code.
4️⃣ Enable Calico Ingress Gateway
Now, let’s switch on the Calico Ingress Gateway. We do this by applying a GatewayAPI CR. Remember, this CR belongs to the Tigera Operator (operator.tigera.io/v1) and acts as the ‘on’ switch. Creating it tells the operator to deploy its managed Envoy Proxy, which will handle our incoming traffic. Calico uses Envoy as its engine for implementing the official Kubernetes Gateway API standard, giving us access to powerful routing and security features.
- Use the following command to enable Calico Ingress Gateway capabilities:
kubectl create -f - <<EOF
apiVersion: operator.tigera.io/v1
kind: GatewayAPI
metadata:
 name: default
EOF
This Calico-specific GatewayAPI resource is the essential prerequisite before we can use Kubernetes gateway API standard objects.
- Use the following command to verify the deployment status:
kubectl wait --for=condition=Available tigerastatus gatewayapiTo ensure the Envoy deployment is fully up and running before we proceed, we wait for the previous command to report back “condition met”. This ensures the operator is ready to manage ingress traffic.
Calico Ingress Gateway bundles a secure custom built image of Envoy Proxy, a popular and feature rich open source project that needs no introduction. Our integration provides a set of utilities that you can use to secure, manipulate or even change Layer 7 communications such as HTTP, gRPC etc.
5️⃣ Deploy Gateway API Resources
This is where the magic of Gateway API happens! We define how traffic enters the cluster and where it goes using standard, portable resources.
In this example, we need to create three key Gateway API resources: We define two core Gateway API resources:
- Gateway: Acts as the entry point for external traffic, binding to a specific address and port.
- HTTPRoute: Defines the actual routing rules, specifying how requests should be matched and forwarded to backend services.
Gateway
The Gateway resource defines the cluster’s entry point for external traffic, something typically owned and managed by the platform or infrastructure team. It specifies a gatewayClassName (in our case, tigera-gateway-class), signaling that Calico’s Ingress Gateway should manage this Gateway instance.
Within the spec, we define one or more listeners, which describe the network interfaces exposed by the Gateway, for example, HTTP traffic on port 80. These listeners determine which protocols are accepted and how they are handled.
Use the following command to create a gateway:
kubectl create -f - <<EOF
apiVersion: gateway.networking.k8s.io/v1
kind: Gateway
metadata:
 name: calico-demo-gw2
spec:
 gatewayClassName: tigera-gateway-class
 listeners:
   - name: http
     protocol: HTTP
     port: 80
EOF
Notes:
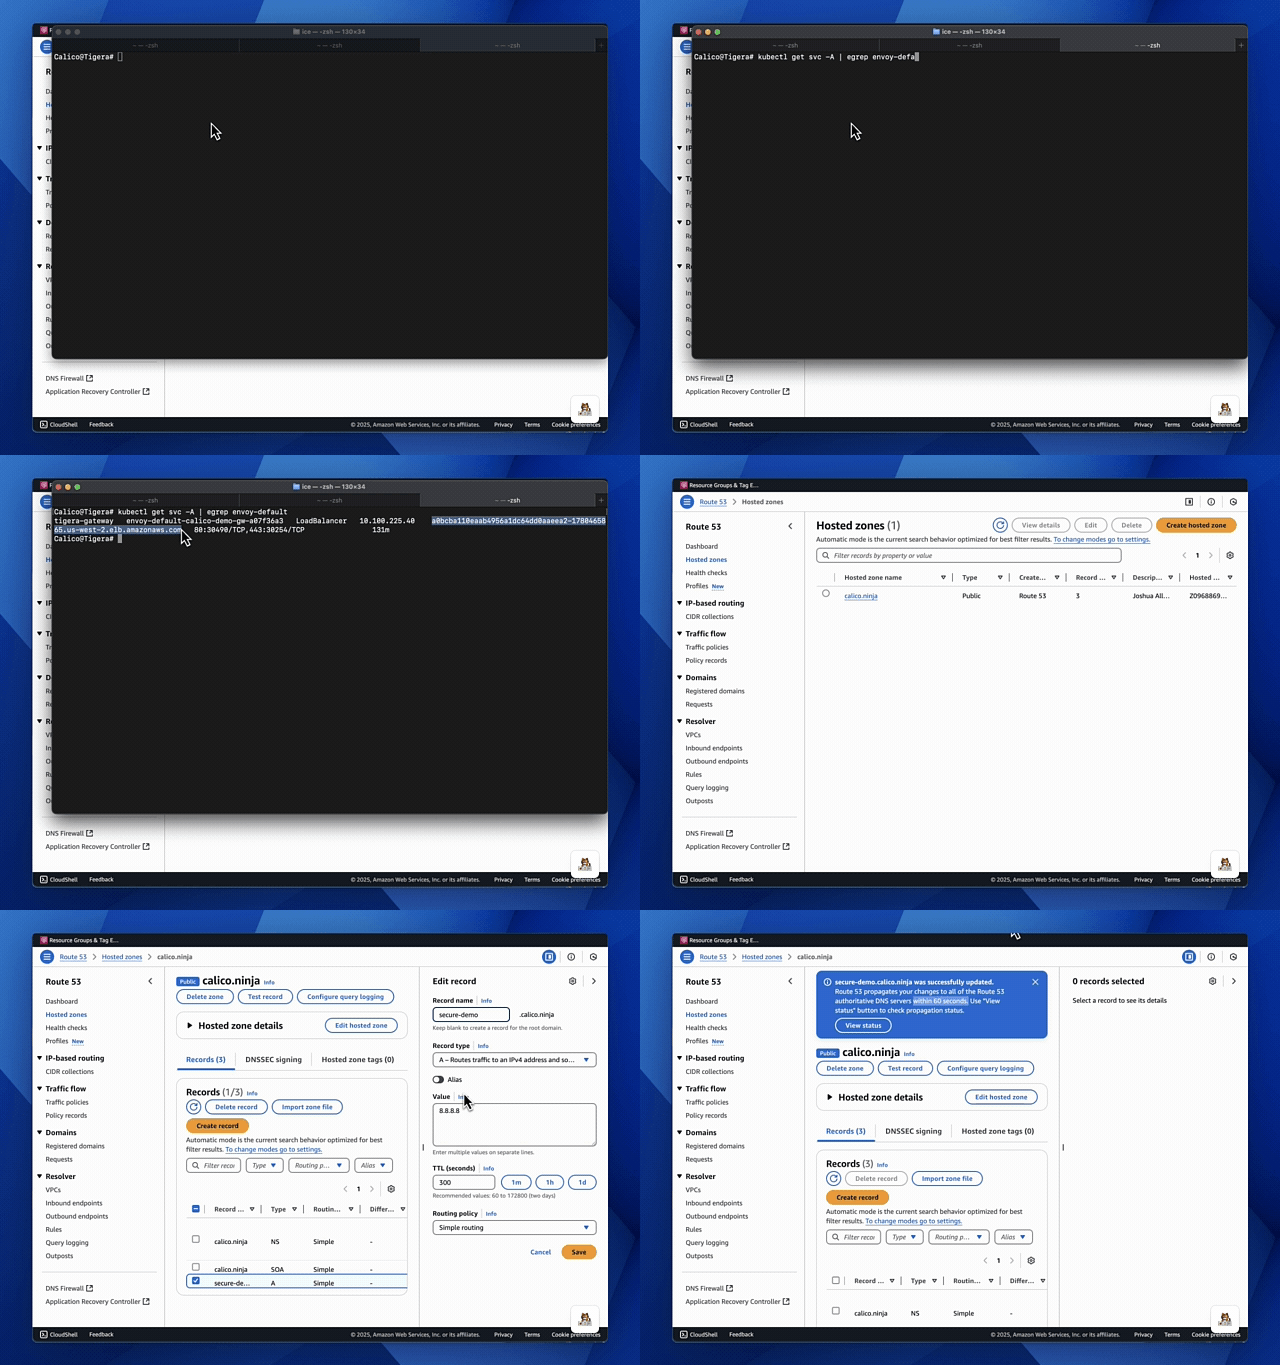
- When a Gateway is created, it usually triggers the provisioning of a Kubernetes LoadBalancer Service, making the Gateway accessible to external clients. You can confirm this by listing your cluster services inside the tigera-gateway namespace named
envoy-default-calico-demo-gw-xxxxxxx. - At this stage we need to add the Calico Ingress Gateway IP to the domain A record that we added in the https section.
HTTPRoute
The HTTPRoute is where application-level routing logic lives, typically managed by the application or platform team. It defines how traffic, once accepted by a Gateway, should be routed within the cluster.
In our example, the HTTPRoute attaches to the previously defined Gateway via a parentRef. This creates a clear handoff: the Gateway handles ingress traffic, and the HTTPRoute determines what to do with it.
- Use the following command to create HTTPRoute:
kubectl create -f - <<EOF
apiVersion: gateway.networking.k8s.io/v1
kind: HTTPRoute
metadata:
 name: http-access
 namespace: default
spec:
 parentRefs:
 - group: gateway.networking.k8s.io
   kind: Gateway
   name: calico-demo-gw
 rules:
 - backendRefs:
   - group: ""
     kind: Service
     name: frontend
     namespace: default
     port: 80
     weight: 1
   matches:
   - path:
       type: PathPrefix
       value: /
EOF
We define a simple rule that matches all HTTP requests (path /) and forwards them to the frontend service in the default namespace. This rule-based routing offers a powerful, flexible alternative to the more rigid path definitions of traditional Ingress objects enabling better separation of concerns and easier collaboration between infrastructure and app teams.
- Verify access:
At this point you should be able to open the Online Boutique by pointing your browser to the newly created service.curl -I http://a78ef864683d543e59c7d91fba812176-247554297.us-west-2.elb.amazonaws.com/You should see a result with a
HTTP/1.1 200indicating that our application is now accessible to the public and its working “200” but it is unencrypted hence theHTTP/1.1response but don’t worry, within the next steps we are going to add a valid certificate and secure our website.HTTP/1.1 200 OK set-cookie: shop_session-id=039ddecf-173a-47c8-bb9b-420c6880b337; Max-Age=172800 date: Fri, 23 May 2025 00:53:38 GMT content-type: text/html; charset=utf-8 transfer-encoding: chunkedNote: in this example, all our resources are in the same namespace so we don’t need any additional resources to make the scenario work. However, If you are trying to access cross namespace resources you should create a ReferenceGrant. Click here if you’d like to learn more.
6️⃣ SSL Certificate and Automated Certification Process with Cert-Manager
Manually managing TLS certificates is tedious and error-prone. cert-manager automates issuance, renewal, and configuration, ensuring our application remains secure with valid certificates.
- Install cert-manager
kubectl create -f https://github.com/cert-manager/cert-manager/releases/download/v1.17.2/cert-manager.yaml - Enable GatewayAPI integration
Use the following command that enables gatewayapi integration:kubectl patch deployment -n cert-manager cert-manager --type='json' --patch ' [ { "op": "add", "path": "/spec/template/spec/containers/0/args/-", "value": "--enable-gateway-api" } ]'By default cert-manager GatewayAPI integration is not enabled. This is the part that monitors the gateway api resources to issue certificates for them.
- Create ClusterIssuer for Let’s Encrypt
Issuers and ClusterIssuers are cert-manager resources that represent certificate authorities (CAs) capable of signing certificate requests. Every Certificate resource in cert-manager needs an associated Issuer (or ClusterIssuer) that is in a “Ready” state to process the request.In our case, we create a ClusterIssuer, which is a cluster-scoped resource used to configure a CA in this example, Let’s Encrypt. We configure it to use the HTTP-01 challenge method for domain validation and explicitly tell it to solve these challenges via our calico-demo-gw Gateway. This setup allows Let’s Encrypt to verify our domain ownership by routing validation traffic through the Calico Ingress Gateway.Note: Be sure to replace <USER-YOUR-EMAIL-HERE> with your actual email address. This is required by Let’s Encrypt for important expiry notices and terms of service updates.Use the following command to create a clusterissuer resource:kubectl create -f -<<EOF apiVersion: cert-manager.io/v1 kind: ClusterIssuer metadata: name: letsencrypt spec: acme: server: https://acme-v02.api.letsencrypt.org/directory email: <USER-YOUR-EMAIL-HERE> privateKeySecretRef: name: letsencrypt-account-key solvers: - http01: gatewayHTTPRoute: parentRefs: - kind: Gateway name: calico-demo-gw namespace: default EOF
Enabling HTTPS using Calico Ingress Gateway
Now that we have a gateway, and our certification resource configured we can annotate our gateways with cert-manager labels and thanks to the gatewayapi integration that we enabled previously they should communicate with ACME to get a free certificate.
- Use the following command to annotate the demo gateway:
kubectl annotate --overwrite gateway/calico-demo-gw cert-manager.io/cluster-issuer=letsencrypt - We also need to add a HTTPS section to our gateway. Use the following patch to add HTTPS to your gateway.
Note: Be sure to replace <YOUR-DOMAIN-NAME> with your actual domain address. This is required since our certification is going to be issued for that domain.kubectl patch gateway calico-demo-gw --type=json --patch ' - op: add path: /spec/listeners/- value: name: https protocol: HTTPS port: 443 hostname: <YOUR-DOMAIN-NAME> tls: mode: Terminate certificateRefs: - kind: Secret group: "" name: secure-demo-cert 'At this point you should be able to open the Online Boutique by pointing your browser to the newly created service.
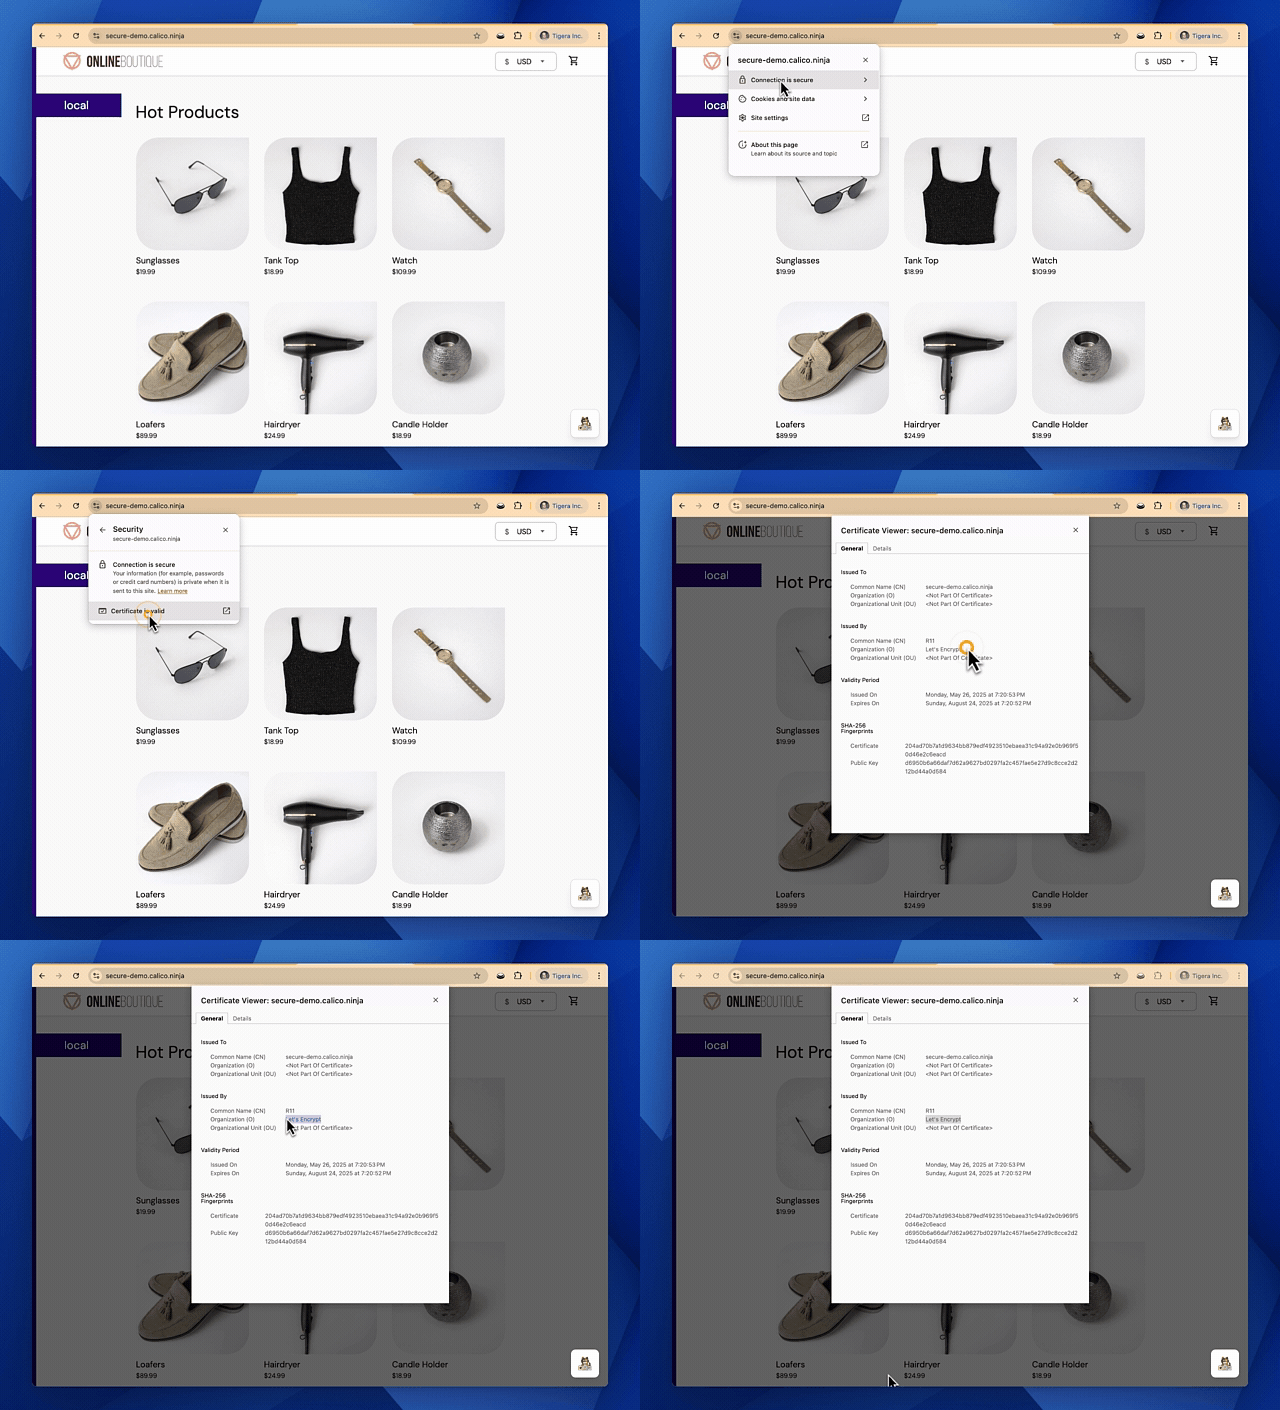
curl -I https://secure-demo.calico.ninja/ - Verify You should see a result similar to the following:
HTTP/2 200
set-cookie: shop_session-id=dac269ac-ff27-4749-a494-5d5d6793eb7a; Max-Age=172800
date: Fri, 23 May 2025 00:53:42 GMT
content-type: text/html; charset=utf-8
Alternatively you can check the certificate using your favorite browser.
7️⃣ Force Redirect to HTTPS
Now that we have a HTTPS capable gateway, we should implement some sort of redirection to automatically steer all our users to the secure endpoint, even if they are trying to connect to the HTTP endpoint.
You can verify that our HTTP users can still use the unencrypted gateway by running the curl command against the HTTP endpoint.
Note: To redirect users we use filter and RequestRedirect type, setting the scheme to https and the statusCode to 301. By setting this filter to section name http we make sure that only requests that are headed to our HTTP gateway will be redirected to HTTPS.
- We begin by updating the existing http-access HTTPRoute. Instead of forwarding traffic to the backend service, it now issues an HTTP 301 redirect to the HTTPS version of the site. This is a standard best practice to ensure users always access the secure endpoint.
kubectl replace -f - <<EOF apiVersion: gateway.networking.k8s.io/v1 kind: HTTPRoute metadata: name: http-access namespace: default spec: parentRefs: - group: gateway.networking.k8s.io kind: Gateway name: calico-demo-gw namespace: default port: 80 sectionName: http rules: - filters: - type: RequestRedirect requestRedirect: scheme: https statusCode: 301 port: 443 matches: - path: type: PathPrefix value: / EOF - Verify. Let’s check our HTTP endpoint again.
curl -I http://secure-demo.calico.ninja/You should see a response similar to the following:
HTTP/1.1 301 Moved Permanently
location: https://secure-demo.calico.ninja/
date: Fri, 23 May 2025 00:57:01 GMT
transfer-encoding: chunked
We got the expected 301 Moved Permanently response. However, this change breaks the actual delivery of the site over HTTPS because we haven’t defined a route for the HTTPS listener yet, if you remember we added our route to only apply to the http section.
- To fix this, we create a new route: https-access. This route is similar to the original http-access, but with a crucial difference: it sets sectionName: https in its parentRefs, ensuring it applies only to traffic received over the HTTPS listener.
kubectl create -f - <<EOF
apiVersion: gateway.networking.k8s.io/v1
kind: HTTPRoute
metadata:
 name: https-access
 namespace: default
spec:
 parentRefs:
 - group: gateway.networking.k8s.io
   kind: Gateway
   name: calico-demo-gw
   sectionName: https
 rules:
 - backendRefs:
   - group: ""
     kind: Service
     name: frontend
     namespace: default
     port: 80
     weight: 1
   matches:
   - path:
       type: PathPrefix
       value: /
EOF
🎉 Congratulations, you’ve deployed your website securely using a valid HTTPS certificate!
8️⃣ Clean up
If you followed the steps in this blog post to create the demo environment use the following command to clean up the resources after testing:
kubectl delete gateway calico-demo-gw
eksctl delete cluster my-calico-cluster
Looking Ahead
The journey through Kubernetes traffic management is evolving. For years, Ingress served us well, but as our applications and operational models grew in complexity, its limitations became increasingly apparent. The “pile of vendor annotations,” the blurred lines of responsibility, and the struggle for richer protocol support signalled the need for a change.
Ingress NGINX’s retirement in March 2026 highlights the limits of the Ingress model. Annotation sprawl, vendor lock-in, and security gaps make continuing with it increasingly risky.
While the Ingress NGINX controller won’t vanish overnight, the path forward is clear. The Kubernetes Gateway API, brought to life by implementations like the Calico Ingress Gateway, offers a more sustainable, secure, and feature-rich approach. By making the leap, you’re not just adopting a new technology; you’re investing in a more streamlined, resilient, and future-proof way to manage traffic in your Kubernetes environments.
To learn more about GatewayAPI, check out this recording of our session:
📚 Your Guided Reading on NGINX Deprecation
Get up to speed on Ingress NGINX retirement and learn how to migrate confidently. Follow these posts in order for a structured path from awareness to action:
- Step 1 – Understand the change: Ingress NGINX Controller Is Dead — Should You Move to Gateway API?
- Step 2 – Assess your options: Is It Time to Migrate? A Practical Look at Kubernetes Ingress vs Gateway API
- Step 3 – Explore migration strategy: 5 Reasons to Switch to the Calico Ingress Gateway and How to Migrate Smoothly
- Step 4 – Deep dive into Calico Ingress Gateway: A Detailed Look at the Calico Ingress Gateway
- Step 5 – Understand security implementation: Securing Kubernetes Traffic with Calico Ingress Gateway
- Step 6 – Take action:
Ask for a demo
This reading path ensures you go from understanding the NGINX deprecation to a practical migration plan with confidence.