










Securing what comes into your Kubernetes cluster often gets top billing. But what leaves your cluster, outbound or egress traffic, can be just as risky. A single compromised pod can exfiltrate data, connect to malicious servers, or propagate threats across your network. Without proper egress controls, workloads can reach untrusted destinations, creating serious security and compliance risks. This guide breaks down five practical steps to strengthen Kubernetes egress security, helping teams protect data, enforce policies, and maintain visibility across clusters.
Why Egress Controls Matter 🔐By default, Kubernetes allows unrestricted outbound communication, meaning any pod can reach any external destination and dramatically increase the attack surface. Implementing egress controls ensures pods can communicate only with explicitly trusted services, containing the impact of a compromised workload and preventing unauthorized data exfiltration or lateral movement. Granular egress controls are also essential for meeting security and compliance mandates, providing authorization, logging, and monitoring for all external connections. |
Your Kubernetes Egress Security Checklist
To help teams tackle this challenge, we’ve put together a Kubernetes Egress Security Checklist, based on best practices from real-world environments. Whether you’re just beginning to define your egress policies or looking to strengthen your existing posture, these 5 steps will help you reduce risk and improve visibility.
Step 1: Establish a Strong Default Security Baseline
🧱 Mandatory Security Posture
[ ] Implement Global Default-Deny: Establish a global default-deny policy for all Ingress and egress traffic as a first-order security and compliance requirement. Ensure it explicitly excludes critical system pods and allows necessary DNS traffic.
[ ] Adopt Policy Tiers: Utilize hierarchical policy tiers (e.g., security tier for global egress rules, application tier for microsegmentation) to manage precedence and delegate granular controls effectively.
[ ] Centralize Egress Management: Centralize the implementation and management of egress security policies to optimize the cluster’s security posture and simplify operations.
[ ] Design for Native Compliance: Build a scalable security design that accommodates Day-1 and Day-N enforcement, ensures native compliance of applications, and supports real-time enforcement.
💡 Pro Tip: A strong baseline makes all other steps more effective. Start here before adding advanced controls.
Step 2: Build Scalable, Precise Policies
🎯 Policy Design & Implementation
[ ] Establish Label Standard: Define and enforce a robust label standard across your environment. Ensure all pods, hosts, and network sets are consistently and appropriately labeled to enable precise policy targeting.
[ ] Leverage Network Sets: Group external IP addresses and domain names into NetworkSet or GlobalNetworkSet resources for centralized management, improved visibility in logs, and simplified policy creation.
[ ] Implement Granular Controls: Define granular egress controls for your application microservices, aligning with their communication patterns.
[ ] Utilize FQDN-based Policies (Calico Enterprise/Cloud): Employ Fully Qualified Domain Name (FQDN) based egress security policies to target external services that use dynamic IP addresses, ensuring scalability and preventing backdoors.
[ ] Integrate Threat Intelligence (Calico Enterprise/Cloud): Configure threat intelligence feeds and network policies to automatically deny egress access to known malicious destinations, enhancing defence against cyber threats.
[ ] Ensure Automated Enforcement: Design for automatic enforcement of egress policies, especially for dynamically provisioned resources like VMs during autoscaling.
💡 Pro Tip: Granular policies reduce risk without slowing down development or operations.
Step 3: Manage Outbound IPs with Egress Gateways
🚪 Controlled Access & Visibility
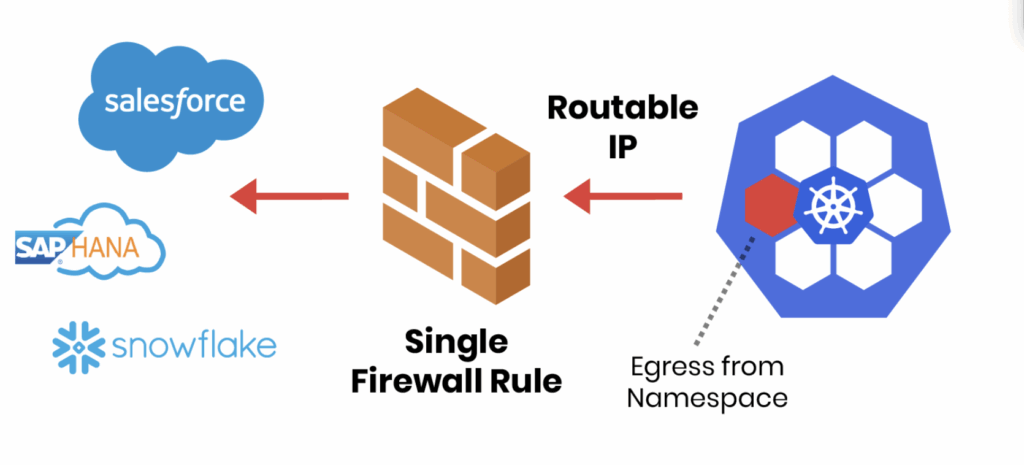
[ ] Assign Static Egress IPs: Use egress gateways to assign fixed, controlled source IP addresses to specific applications, namespaces, or deployments for outbound traffic, particularly for integration with external firewalls or services with strict IP whitelisting.
[ ] Provision Dedicated IP Pools: Create dedicated IP pools for egress gateways, including AWS-backed IP pools for native VPC integration, to control the range of source IPs used. Ensure CIDRs are reserved in the AWS fabric to avoid conflicts.
[ ] Configure ENI Modes (AWS): Choose between ENI-per-workload and Secondary-IP-per-workload modes based on your instance types, workload churn rates, and IP address allocation needs.
[ ] Plan for Load Balancing & Failover: Deploy multiple egress gateways per group for high availability, load balancing of outbound traffic, and fast failover. Optionally enable ECMP load balancing on client nodes if required.
[ ] Understand Policy Enforcement with Gateways: Recognize that policy applied on the client pod is most powerful (sees original source/destination). Policies on the egress gateway pod have limitations regarding domain-based matching and source IP information.
💡 Pro Tip: Egress gateways are your compliance and visibility enforcer—plan for HA and load balancing from the start.
Step 4: Govern, Validate, and Monitor Policies
🔍 Operational Aspects
[ ] Define Policy Lifecycle: Establish a clear process and lifecycle for egress policies, covering access request, enforcement, and ongoing monitoring.
[ ] Design for Minimal Changes: Create policies that require minimal updates by effectively using network sets and dynamic labels. Update network sets as external resource requirements change, and label pods as new ones need access.
[ ] Validate Policies Before Enforcement: Always simulate and validate policies using tools like netcat or curl. For Calico Enterprise/Cloud, utilize staged policies to preview impact; for Calico Open Source, use the log action.
[ ] Implement Continuous Monitoring: Monitor egress traffic and policy effectiveness using Calico’s Policies board, Dynamic Service and Threat Graph, and custom Kibana dashboards to identify misconfigurations, denied flows, and traffic patterns.
[ ] Implement RBAC for Policy Management: Define Role-Based Access Control (RBAC) to enable different personas (Security, Platform, Developers) to provision policies according to their privileges and responsibilities.
[ ] Ensure Security Governance: Implement pull request policies and admission controllers in your CI/CD pipeline to ensure application manifests and container deployments adhere to authorized labels and security contexts.
[ ] Standardize and Centralize Policies: Adopt a centralized and standard Kubernetes security policy model, potentially using a GitOps approach, to apply consistent controls across multiple cloud and on-premises clusters.
💡 Pro Tip: Governance and monitoring make your egress policies sustainable, not just reactive.
Step 5: Take the Next Step
🚀 Strengthen Your Kubernetes Egress Security
[ ] Review your current egress policies using this checklist to identify gaps in enforcement, DNS handling, and FQDN-based rules.
[ ] Identify and prioritize quick wins like implementing a global default-deny policy or standardizing labels to make immediate improvements.
[ ] Engage your security, platform, and development teams to align on roles, responsibilities, and ownership of policy enforcement.
[ ] Roll out changes in stages using Calico’s policy tiers and simulation tools to validate policies before enforcement.
[ ] Monitor and optimize policies over time with observability tools like Calico’s Dynamic Service & Threat Graph or custom Kibana dashboards to detect misconfigurations, denied flows, and traffic patterns.
💡 Next Move: Securing egress traffic isn’t just about checking a compliance box; it’s about protecting the integrity of your Kubernetes ecosystem. Each step you take builds stronger, more resilient defenses against data exfiltration and external threats.
This checklist is just the start. Our free eBook, The Complete Guide to Kubernetes Egress Security, walks you through step-by-step implementation examples, detailed architectures, and advanced egress gateway strategies.
👉 Download The Complete Guide to Kubernetes Egress Security and start building a more secure Kubernetes environment today. You can also join the conversation in our Calico Slack community to share your egress security challenges and learn from peers.
Your workloads deserve the same protection on the way out as they get coming in so start strengthening your egress security today.