










Rolling out network policies in a live Kubernetes cluster can feel like swapping wings mid-flight—one typo or overly broad rule and critical traffic is grounded. Calico’s Staged Network Policies remove the turbulence by letting you deploy policies in staged mode, so you can observe their impact before enforcing anything. Add Whisker, the open-source policy enforcement and testing tool (introduced as part of Calico Open Source 3.30) that captures every flow and tags it with a policy verdict, and you’ve got a safety harness that proves your change is sound long before you flip the switch. In this post, we’ll walk you through how you can leverage these capabilities to tighten security, validate intent, and ship changes confidently—without a single packet of downtime.
Deploying a Kubernetes Cluster
Calico for Policy is a CNI agnostic tool. Refer to the Calico Open Source docs for a list of supported CNIs. The git repository for this blog post can be found here.
For this post, let’s deploy a simple AKS cluster with Azure CNI.
## Configure
az group create --name calicooss --location eastus2
## Create a 3 node AKS cluster with Azure CNI
az aks create
  --resource-group calicooss
  --name calico-whisker
  --node-count 3
  --network-plugin azure
  --kubernetes-version 1.31.8
## Retrieve the kubeconfig file
az aks get-credentials --resource-group calicooss --name calico-whisker
Now that our cluster is deployed. Let’s provision a demo application.
Deploying the yaobank Application
For this post, we will deploy a three-tier web application called “yet-another-bank” (yaobank). The manifest for the application can be found at this link.
## Apply yaobank manifest
kubectl apply -f app/yaobank.yaml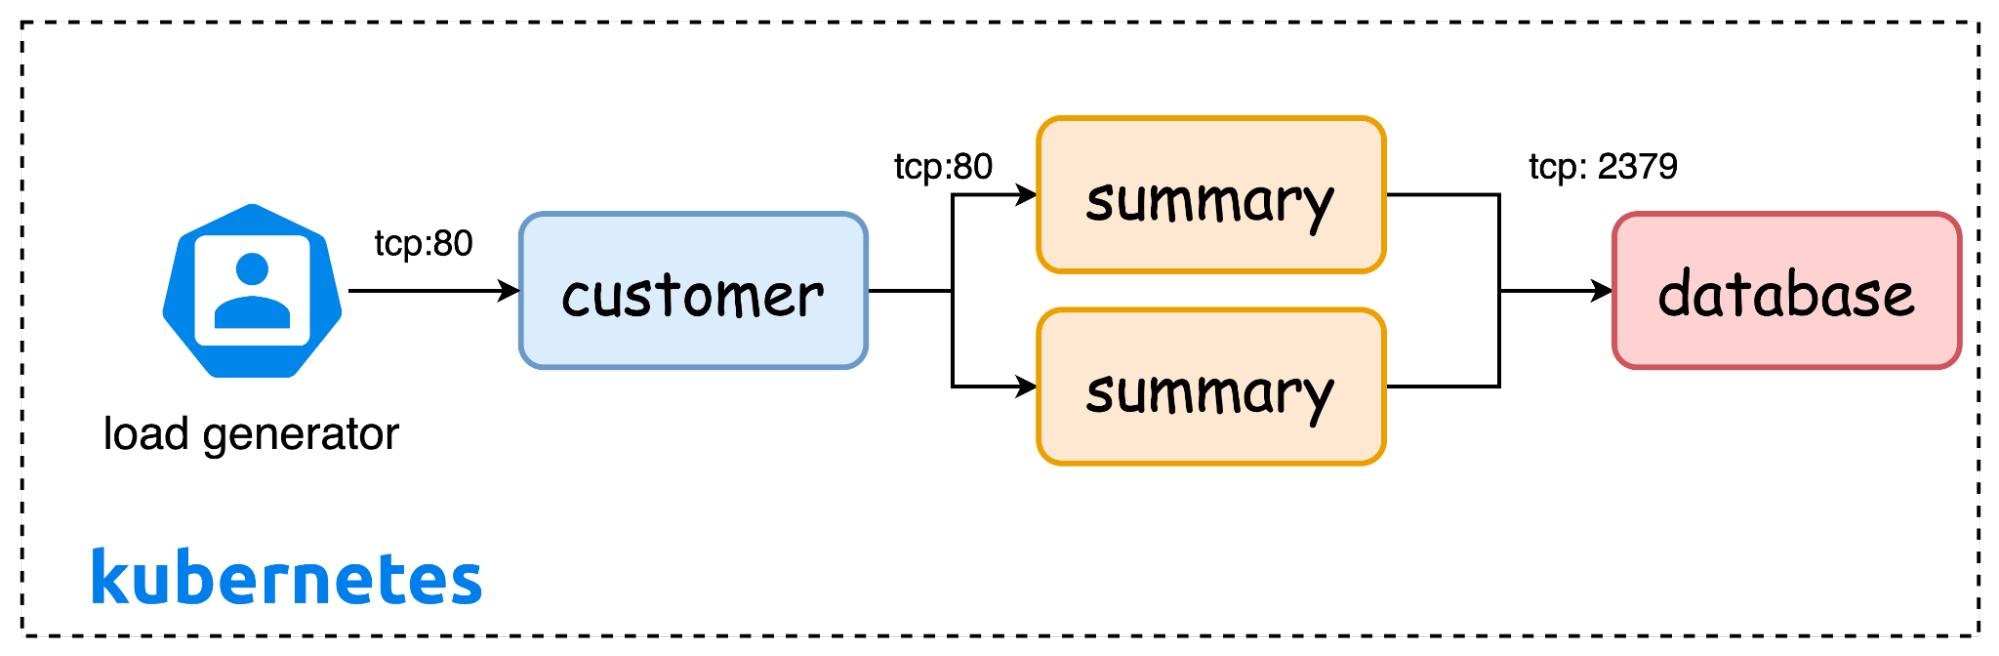
Once the manifest is applied, verify that the application workloads were successfully deployed.
kubectl get pods -n yaobank
NAME                             READY   STATUS    RESTARTS   AGE
customer-676fb786c-8x657         1/1     Running   0          28m
database-597d665548-d7ktd        1/1     Running   0          28m
loadgenerator-658d89b5fd-7ptm8   1/1     Running   0          28m
summary-57569999f-q9gzv          1/1     Running   0          28m
summary-57569999f-qh5f4          1/1     Running   0          28m
Next let’s look at how we can install Calico for Policy.
Installing Calico for Policy
We’ll perform a Helm-based install of Calico for Policy, the edition of Project Calico that brings only the policy-enforcement and observability components into your cluster, while leaving the actual pod networking to the existing platform CNI. In practice, this means in this example, we keep Azure’s IP-address management and routing exactly as they are, but gain Calico’s advanced security features: Calico’s richer Network Policy, hierarchical policy tiers, flow-log generation, and tools like Whisker UI for real-time traffic insight. In short, you get enterprise-grade microsegmentation and visibility without swapping out or even touching your current CNI—just install, validate, and start writing policies
To ensure the operator deploys just these policy components (and skips the Calico CNI plugin), we set installation.kubernetesProvider: AKS in calico-values.yaml.
# Calico operator settings for AKS Azure CNI
installation:
  kubernetesProvider: AKS
Once you have your helm values.yaml file ready, you can perform the following helm based install of Calico for policy.
helm install calico projectcalico/tigera-operator
  --version v3.30.0
  --namespace tigera-operator
  --create-namespace
  --values calico-helm-values/calico-values.yaml #include the path to your helm values.yaml file
The install should complete in a few minutes. You can run kubectl get tigerastatus to confirm that all components are successfully deployed.
kubectl get tigerastatus
NAME        AVAILABLE   PROGRESSING   DEGRADED   SINCE
apiserver   True        False         False      27s
calico      True        False         False      2s
goldmane    True        False         False      7s
ippools     True        False         False      32s
whisker     True        False         False      32s
Connect to Whisker UI
Once the installation is complete, let’s do a port forward so that we can access the Whisker UI.
kubectl port-forward service/whisker 8081 -n calico-systemOnce the port forward is in place, the Whisker UI can be accessed at:
kubectl port-forward service/whisker 8081 -n calico-system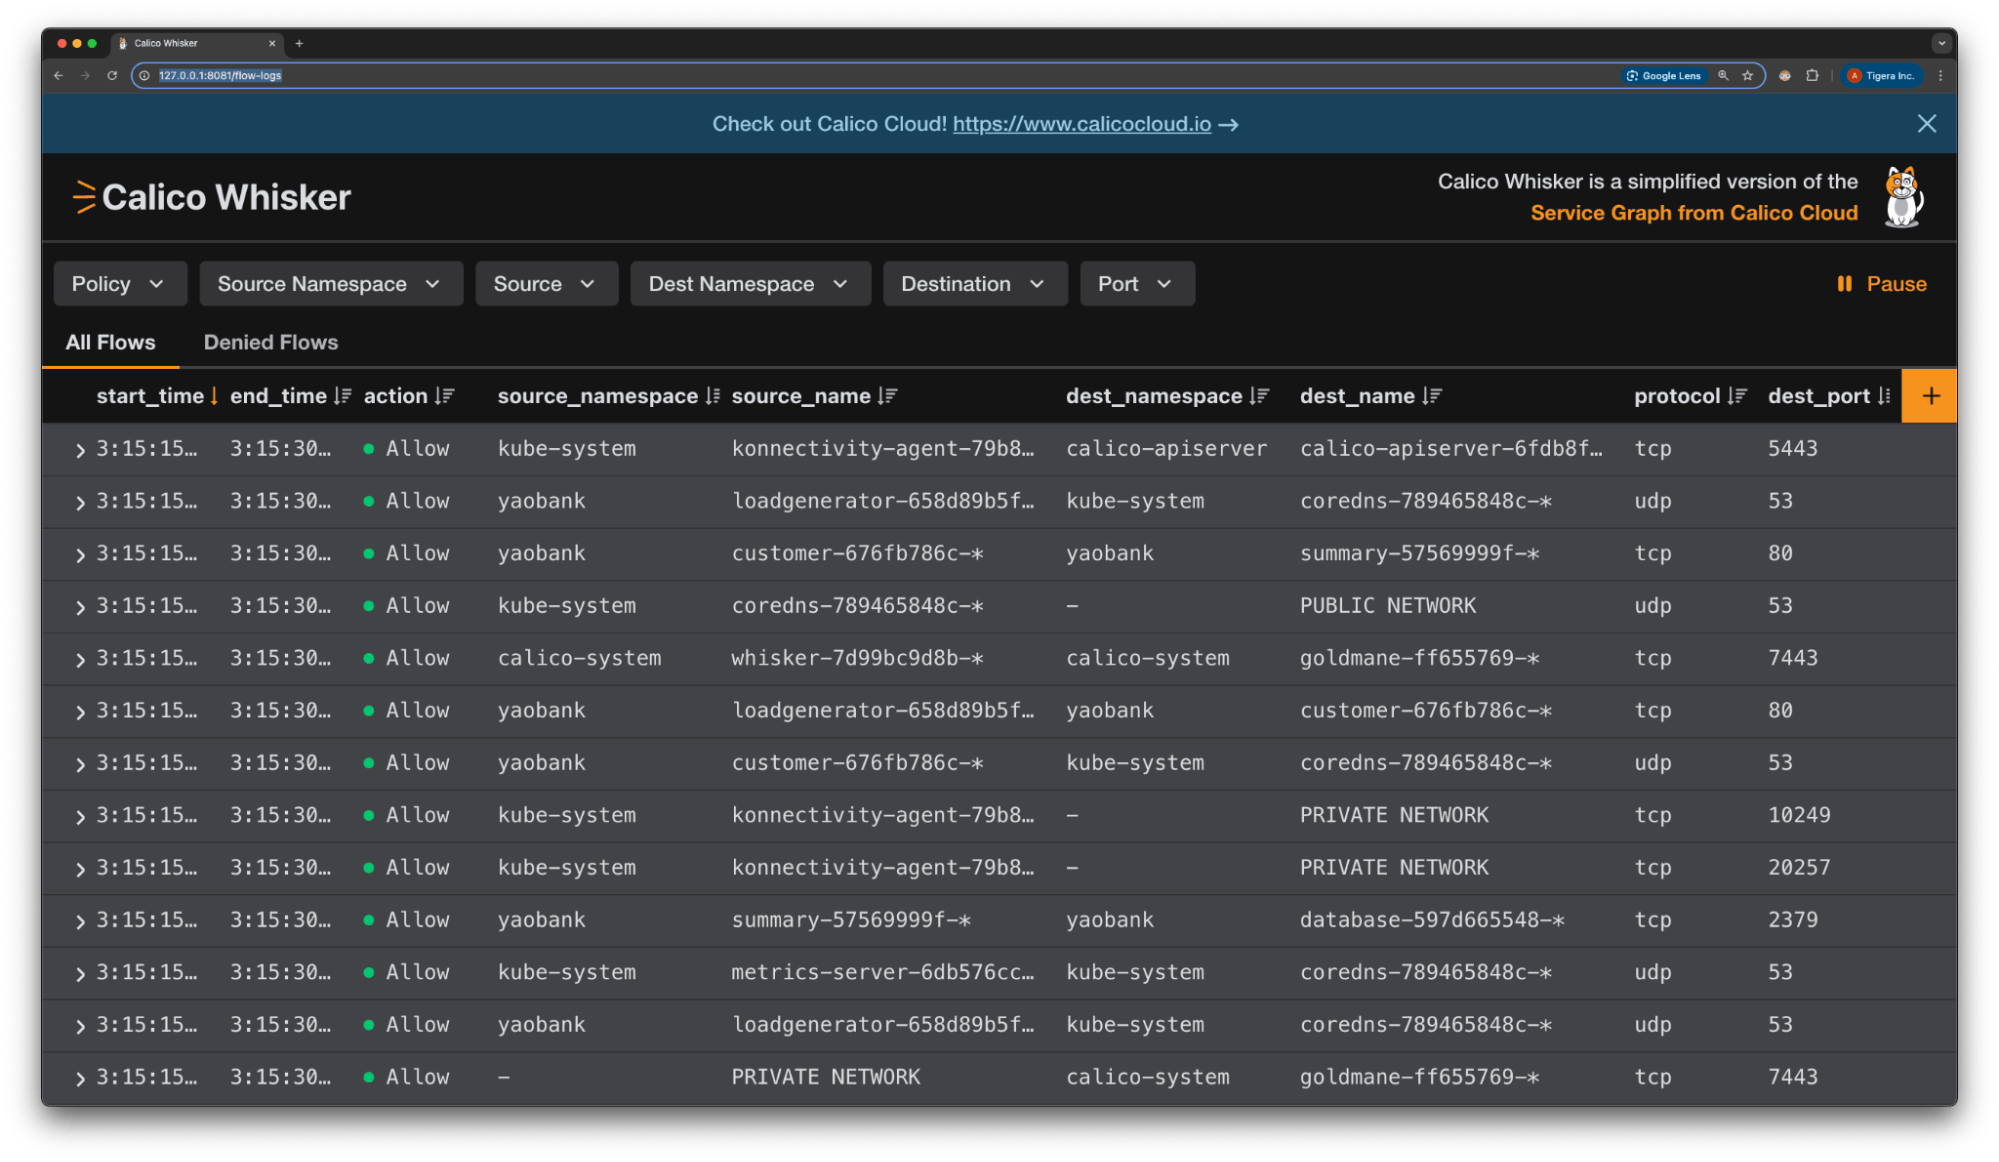
The Whisker UI can be used to perform tasks such as:
- Watch a live stream of network flow logs as they arrive, updated in real-time.
- Filter flows with the drop-down menus. This can be done using attributes such as Policy, Source Namespace, Source Pod, Destination Namespace, Destination Pod/Service, and Port.
- Pause / Resume the live feed.
- Expand a row (chevron ▸) to reveal full flow details: bytes, packets, reporter, policies that touched the flow, labels, timestamps, etc.
- Correlate flows with staged policies. Whisker shows the policy list column so you can see whether a connection hit an enforced rule or a staged one you’re testing.
Now that we have connected to the Whisker UI, let’s start deploying and validating network policies.
Deploy Staged Network Policy
Based on our understanding of the application, we have developed the following network policies. Note that these policies are of kind: StagedNetworkPolicy, which tells Calico to simulate the rules against live flow logs instead of enforcing them. In other words, packets still follow the cluster’s existing network policies, but every connection is run through the staged network policies and the verdicts are included in flow logs. The beauty of this approach is that the cluster can run enforced and staged policies side by side, letting you roll out new policies incrementally and flip them to enforce only when you’re confident they won’t disrupt legitimate traffic.
We first deploy a policy to the yaobank namespace to allow all egress on UDP 53 for DNS:
apiVersion: projectcalico.org/v3
kind: StagedNetworkPolicy
metadata:
  name: yaobank-dns
  namespace: yaobank
spec:
  egress:
    - action: Allow
      protocol: UDP
      destination:
        ports:
          - 53
Next, we will deploy network policies for each of the workloads.
- Network Policy for load generator workload
apiVersion: projectcalico.org/v3
kind: StagedNetworkPolicy
metadata:
  name: loadgenerator
  namespace: yaobank
spec:
  selector: app == 'loadgenerator'
  egress:
    - action: Allow
      protocol: TCP
      destination:
        selector: app == 'customer'
        ports:
- 80- Network Policy for customer workload
apiVersion: projectcalico.org/v3
kind: StagedNetworkPolicy
metadata:
  name: customer
  namespace: yaobank
spec:
  selector: app == 'customer'
  ingress:
    - action: Allow
      protocol: TCP
      destination:
        ports:
          - 80
  egress:
    - action: Allow
      protocol: TCP
      destination:
        selector: app == 'summary'
        ports:
- 80- Network Policy for summary workload
apiVersion: projectcalico.org/v3
kind: StagedNetworkPolicy
metadata:
  name: summary
  namespace: yaobank
spec:
  selector: app == 'summary'
  ingress:
    - action: Allow
      protocol: TCP
      source:
        selector: app == 'customer'
      destination:
        ports:
          - 80
  egress:
    - action: Allow
      protocol: TCP
      destination:
        selector: app == 'database'
        ports:
- 2279- Network Policy for database workload
apiVersion: projectcalico.org/v3
kind: StagedNetworkPolicy
metadata:
  name: database
  namespace: yaobank
spec:
  selector: app == 'database'
  ingress:
    - action: Allow
      protocol: TCP
      source:
        selector: app == 'summary'
      destination:
        ports:
          - 2379
  egress:
    - action: Allow
After deploying the staged network policies, open Whisker and inspect the flow logs. Focus on entries whose verdict is “pending:[“action”:”deny”]”. These logs reveal traffic that is permitted right now but would be blocked the instant you promote the staged policies to enforce. By reviewing the source and destination pods, namespaces, ports, and the specific staged rule that produced each pending-deny verdict, you can fine-tune the policy, or make any necessary application changes, before committing it to enforcement.
Whisker’s back-end also exposes a REST endpoint at /flows that returns a paged JSON list of flow records. You can query the backend to retrieve logs and parse it through a JSON processor. For example, the query listed below retrieves logs for the past 60 seconds and selects flows that have at least one pending (staged) verdict with action == “Deny” and trigger.kind == “StagedNetworkPolicy”.
curl -G 'http://127.0.0.1:8081/whisker-backend/flows' --data-urlencode startTimeGte=-60 --data-urlencode startTimeLt=0 | jq '.items[] | select(.policies.pending != null and (any(.policies.pending[]; .action == "Deny" and .trigger.kind == "StagedNetworkPolicy")))'It looks like there are matching flows; let’s evaluate the log.
 "start_time": "2025-07-03T19:47:30Z",
  "end_time": "2025-07-03T20:03:30Z",
  "action": "Allow",
  "source_name": "summary-57569999f-*",
  "source_namespace": "yaobank",
  "source_labels": "app=summary | pod-template-hash=57569999f | version=v1",
  "dest_name": "database-597d665548-*",
  "dest_namespace": "yaobank",
  "dest_labels": "app=database | pod-template-hash=597d665548 | version=v1",
  "protocol": "tcp",
  "dest_port": 2379,
  "reporter": "Src",
  "policies": {
    "enforced": [
      {
        "kind": "Profile",
        "name": "kns.yaobank",
        "namespace": "",
        "tier": "",
        "action": "Allow",
        "policy_index": 0,
        "rule_index": 0,
        "trigger": null
      }
    ],
    "pending": [
      {
        "kind": "EndOfTier",
        "name": "",
        "namespace": "",
        "tier": "default",
        "action": "Deny",
        "policy_index": 0,
        "rule_index": -1,
        "trigger": {
          "kind": "StagedNetworkPolicy",
          "name": "summary",
          "namespace": "yaobank",
          "tier": "default",
          "action": "ActionUnspecified",
          "policy_index": 0,
          "rule_index": 0,
          "trigger": null
        }
      }
    ]
  },
  "packets_in": 1880,
  "packets_out": 2824,
  "bytes_in": 329940,
  "bytes_out": 199520
The flow log shows a “pending-deny” verdict for traffic from the summary to the database. Because the verdict was generated on the source side ("reporter": "Src"), the problem lies in the egress rule of the summary policy, not in the database’s ingress rules. A quick look at the YAML reveals the typo: the egress rule specifies port 2279, but the database listens on 2379. Correcting that single digit will turn the verdict to pending-allow once you re-test the staged policy.
apiVersion: projectcalico.org/v3
kind: StagedNetworkPolicy
metadata:
  name: summary
  namespace: yaobank
spec:
  selector: app == 'summary'
  ingress:
    - action: Allow
      protocol: TCP
      source:
        selector: app == 'customer'
      destination:
        ports:
          - 80
  egress:
    - action: Allow
      protocol: TCP
      destination:
        selector: app == 'database'
        ports:
          - 2279
Let’s correct the network policy and reapply it.
apiVersion: projectcalico.org/v3
kind: StagedNetworkPolicy
metadata:
  name: summary
  namespace: yaobank
spec:
  selector: app == 'summary'
  ingress:
    - action: Allow
      protocol: TCP
      source:
        selector: app == 'customer'
      destination:
        ports:
          - 80
  egress:
    - action: Allow
      protocol: TCP
      destination:
        selector: app == 'database'
        ports:
          - 2379
Once done, give it about a minute so that we can retrieve logs with the updated policy verdicts and rerun the query. You will notice that this time there are no matching logs with a verdict of “pending-deny”.
curl -G 'http://127.0.0.1:8081/whisker-backend/flows' --data-urlencode startTimeGte=-60 --data-urlencode startTimeLt=0 | jq '.items[] | select(.policies.pending != null and (any(.policies.pending[]; .action == "Deny" and .trigger.kind == "StagedNetworkPolicy")))'Now we can be confident that the policies we deployed will not deny traffic once enforced. You can monitor the staged network policies for as long as you want before you decide to enforce them. To enforce the policies, simply change kind: StagedNetworkPolicy to kind: NetworkPolicy.
Summary
This post explains how to use Calico’s Staged Network Policies and Whisker (an open-source policy enforcement and testing tool) to securely deploy and validate network policies in a Kubernetes cluster without causing downtime.
It provides a step-by-step guide that includes:
- Deploying a Kubernetes Cluster (specifically an AKS cluster with Azure CNI).
- Deploying a demo application called “yaobank” to the cluster.
- Installing Calico for Policy using Helm, emphasizing how to configure it to work with an existing CNI without replacing it.
- Connecting to the Whisker UI for real-time traffic insight, filtering flow logs, and correlating flows with staged policies.
- Deploying Staged Network Policies, which simulate policy rules against live flow logs without enforcing them.
- Validating policies by identifying and correcting “pending-deny” verdicts in flow logs using Whisker’s UI or REST endpoint. The example demonstrates correcting a typo in a staged policy to ensure traffic will not be denied once the policy is enforced.
- Finally, it explains how to enforce the policies by simply changing
kind: StagedNetworkPolicytokind: NetworkPolicyonce confidence is established.