










23andMe is a popular genetics testing company, which was valued at $6B in 2021. Unfortunately, there was a massive data breach in December 2023, which caused a steep decline in the company’s value and trust, plummeting the company to a penny stock. While this breach was not directly related to Kubernetes, the same risks apply to containers running in your Kubernetes environments. If your containerized applications do not have the right egress access controls defined, chances of data exfiltration are much higher.
The basics
A typical modus operandi for threat actors is to look for vulnerabilities or misconfiguration in the environment and workloads, install malicious pods through privilege escalation techniques, and then exploit this unsecured pod to exfiltrate data.
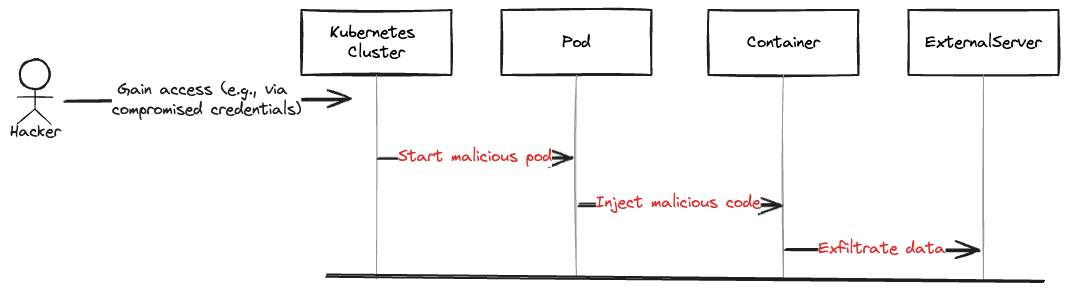
An easy reconnaissance technique by just scanning the cluster network for public-facing workloads will be a first starting point for most attackers. Privilege escalation occurs mostly due to inconsistent or incorrect RBAC policies in Kubernetes through which unauthorized users can gain root privileges. Vulnerabilities in container images as part of the supply chain are also another attack path. All of these techniques will ultimately land on an exposed pod with a remote code execution vulnerability such as log4j. Once the attacker has successfully gained access to the cluster pods, they can either access sensitive data such as credentials after retrieving secrets from the Kubernetes api-server, or directly access system databases from network access.
This blog post aims to provide a comprehensive overview of various strategies for securing egress traffic from Kubernetes pods, including the implementation and benefits of network policies, DNS-based policies, and a Tigera proprietary tool: network sets. By leveraging these strategies, organizations can enhance the security posture of their Kubernetes clusters, ensuring the protection of sensitive data and compliance with regulatory requirements. Without proper security measures in place, data exfiltration, insider threats and other security breaches such as ransomware can occur, compromising the overall security of the cluster and the application.
Using network policies for controlling egress traffic
Egress traffic refers to the traffic that originates from pods within a Kubernetes cluster and is destined for
- other workloads,
- external resources such as the internet, or
- other services outside the cluster.
Your egress access controls implementation starts with Kubernetes network policy. Kubernetes, by default, lacks network security controls, allowing unrestricted communication between workloads within and outside the cluster. The absence of security measures exposes organizations to potential threats, enabling unauthorized communication. Kubernetes network policies help define access controls such as these examples shown below:
- Which pod can communicate to which endpoints (using label selectors)
- Which pods can communicate only on specific protocols and ports
Calico network policy, an extension to basic Kubernetes network policy, can also restrict pods to communicate to specific external destinations. There are a multitude of advanced features and visual tools that Calico commercial versions offer. You can read more about them here.
apiVersion: projectcalico.org/v3
kind: NetworkPolicy
metadata:
  name: allow-tcp-port-6379
  namespace: production
spec:
  selector: color == 'red'
  ingress:
    - action: Allow
      protocol: TCP
      source:
        selector: color == 'blue'
      destination:
        ports:
          - 6379
Fig 2: Sample Calico NetworkPolicy
A pivotal tool for egress access controls: DNS-based policies
Destinations outside of Kubernetes, such as API services, SaaS applications, and other environments often have dynamic IP addresses or domain names instead of IP address. As a result, DevOps and platform teams are confronted with the following challenges:
- Manual updates for changing destination IPs: Teams must continuously monitor and update network policies to accommodate shifting destination IP addresses.
- Application downtime due to IP changes: Failure to promptly update policies with new destination IPs can lead to application downtime, impacting business operations.
- Complexity in scaling for multiple workloads: Managing network policies becomes increasingly complex as the number of workloads and their corresponding destinations multiply, requiring meticulous tracking and coordination.
The ability to write DNS policies allows container workloads to securely connect to an external destination that advertises a domain name. DNS policies in Calico allow you to leverage domain names instead of IP addresses to identify and control traffic to destinations outside of your cluster. This approach offers several advantages, including:
- Operational simplicity: Using domain names in policies simplifies the management of large numbers of domains and subdomains. It eliminates the need to maintain static IP address mappings, especially when dealing with external services that do not have a well-known set of IP addresses.
- Robustness and flexibility: Domain names can include wildcard (*) characters, enabling you to manage a wide range of domains and subdomains effortlessly. This flexibility is particularly useful when dealing with services that have multiple subdomains under a single domain.
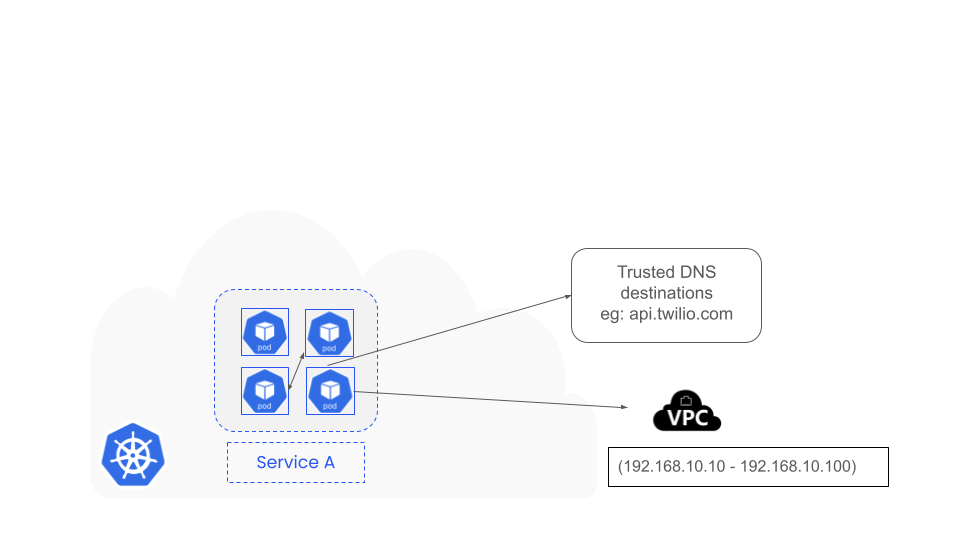
DNS policies in Calico offer a powerful and flexible approach to secure and manage traffic between Kubernetes clusters and external services. By leveraging domain names instead of IP addresses, you can simplify policy management, enhance operational efficiency, and ensure robust security.
How to write a DNS-based policy
To write DNS-based policies in Kubernetes, you can follow the guidelines provided in the Calico documentation page, DNS policy. Here are the steps to create DNS-based policies:
- Determine the allowed egress domains: Identify the domain names to which you want to allow egress traffic from your cluster. These can include external services or APIs.
- Choose the appropriate policy type: Decide whether you want to create a global network policy or a namespaced network policy based on your requirements.
- Create a network policy: Depending on your chosen policy type, create either a GlobalNetworkPolicy or a NetworkPolicy resource. Specify the necessary metadata, such as name, namespace (for namespaced policies), and order.
- Define egress rules: Within the network policy, define egress rules using the action “Allow” and specify the protocol (e.g., UDP) and destination ports (e.g., 53 for DNS).
- Specify domain names: In the egress rules, include the “destination.domains” field and list the domain names you want to allow. You can use exact domain names or use wildcards (*) to match multiple subdomains.
- Apply the policy: Apply the network policy to the desired workload or host endpoints. Ensure that the policy selector matches the appropriate labels or selectors for the targeted endpoints.
- Verify and test: Validate that the DNS-based policies are functioning as expected by testing the egress connectivity to the specified domains from the relevant endpoints.
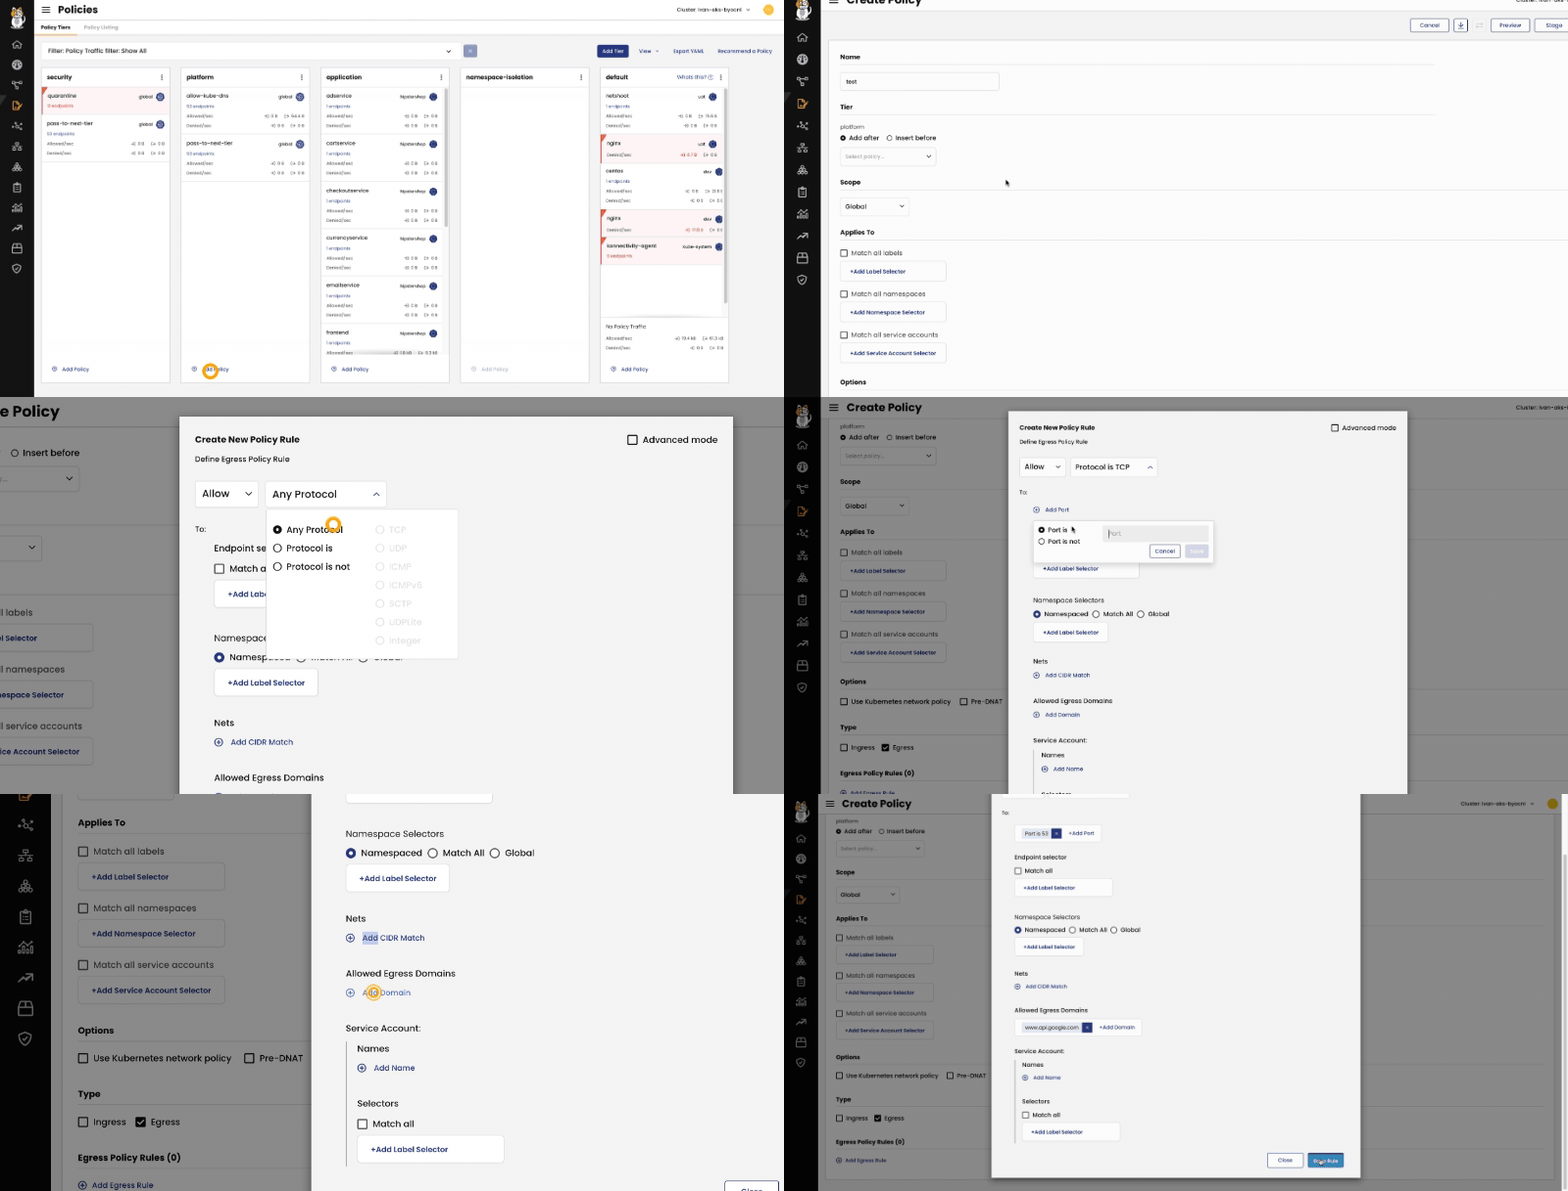
By following these steps, you can effectively create DNS-based policies in Kubernetes to control egress traffic and allow communication with specific domain names outside the cluster. Alternatively, using Calico Enterprise or Calico Cloud, DNS policy creation is simple and intuitive as shown below.
What are network sets and why use them?
Network sets are a Calico resource (Enterprise and Cloud) that allows you to define a set of IP addresses (or CIDRs) and domain names that represent a ‘network’ that pods can access without restrictions. They are defined inside a namespace, and are only applicable to that namespace. A ‘Global NetworkSet’ on the other hand, is a cluster-wide resource that can be used with policies for any namespace. This option can be set in the YAML ‘kind’ or under ‘Scope’ in the UI. Network sets use the standard label selectors for matching criteria in either Kubernetes or Calico network policies.
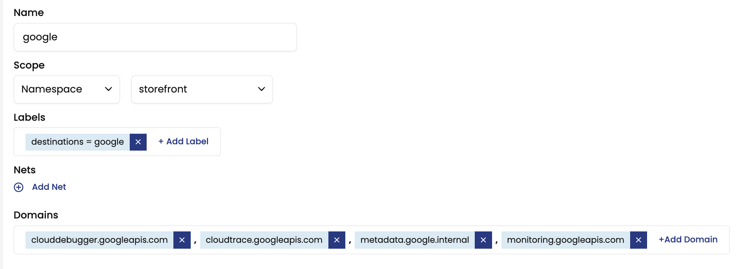
Network sets can be used to create access control policies that allow or deny traffic between pods or pods and external destinations. Network sets can be used to simplify network policies by reducing the number of rules that need to be created.
For example, instead of creating a network policy that allows traffic from all pods in a namespace to a specific IP address, you could create a network set that includes the IP address and then create a network policy that allows traffic from all pods in the namespace to the network set. This would simplify the network policy and make it easier to understand.
kind: NetworkSet
apiVersion: projectcalico.org/v3
metadata:
  name: google
  labels:
    destinations: google
  namespace: hipstershop
spec:
  nets: []
  allowedEgressDomains:
    - clouddebugger.googleapis.com
    - cloudtrace.googleapis.com
    - metadata.google.internal
    - monitoring.googleapis.com
Fig 6: YAML format for a network set
Network sets can also be used to improve security by limiting IP ranges or domains that a pod or a set of pods can communicate to. You can create a network set with a list of known threat actors or even embargoed countries and create a denylist inside a policy. The example below shows how you can define a deny policy with a set of IP addresses.
apiVersion: projectcalico.org/v3
kind: GlobalNetworkSet
metadata:
  name: ip-protect
  labels:
    ip-deny-list: 'true'
spec:
  nets:
    - 192.0.2.55/32
    - 203.0.113.0/24
Fig 7: A Global Network Set with deny-list IP addresses
Summary
As the cloud-native landscape continues to evolve, it is crucial for organizations to stay ahead of the curve and prioritize robust egress access controls. By doing so, they can ensure the security, integrity, and availability of their applications and data in an increasingly interconnected and dynamic environment.
Take the lead in securing your Kubernetes egress traffic. If you are wondering if this is going to be complicated, take a glance at some of our customers who have done it with ease. Implement granular egress access controls and leverage the power of solutions like Calico to protect your organization’s most valuable assets.
Ready to try Calico for yourself? Sign up for a free trial of Calico Cloud.