








Calico policies are a way to enforce network security at the pod level. This blog post will provide a comprehensive overview of Calico policies for Calico OS (Open Source) users. We will cover the basics of Calico policies, including what they are, how they work, and how to use them. We will also provide best practices for using Calico policies and examples of how they can be used in real-world scenarios.
Why use Calico Network Policy?
In the realm of Kubernetes clusters, network traffic management plays a pivotal role in ensuring the security, isolation, and reliability of workloads. Calico Policy emerges as a powerful tool that addresses these challenges head-on, offering a comprehensive suite of features to tame the complexities of network traffic.
Calico network policy provides a robust foundation for securing workloads by establishing clear boundaries and access controls. This capability is particularly crucial in multi-tenant environments or when deploying sensitive applications, preventing unauthorized access and preserving data integrity. By leveraging Calico network policy, organizations can rest assured that their workloads operate within a secure and isolated network environment.
Furthermore, Calico network policy empowers granular control over network traffic, enabling administrators to define precise policies for different applications or services. This fine-grained approach allows organizations to tailor their network security measures to meet specific requirements, optimizing performance and minimizing the risk of breaches.
Calico network policy extends its versatility by supporting a diverse range of policy types. From network policies that govern communication between pods to service policies that manage access to external services, and global network policies that enforce organization-wide security rules, Calico network policy offers the flexibility to address various network security scenarios.
Calico network policy benefits from its open-source nature and widespread adoption within the Kubernetes community. This vibrant ecosystem fosters a wealth of tools, resources, and expertise, ensuring that organizations can leverage the collective knowledge and experience of the Kubernetes community to derive maximum value from Calico network policy.
Last but not least, unlike Kubernetes network policies, Calico network policies offer a range of actions beyond just allowing flows that match a network policy selector condition. Calico allows you to choose between actions such as Allow, Deny, Log, or Pass for a policy rule. The Deny action explicitly denies a specific flow that matches the policy condition. Another key distinction is that Calico network policies can be analyzed in a sequential order, rather than having all policy rules combined in a union boolean operation, as is the case with Kubernetes native policies.
Below, you’ll find a comparison between the NetworkPolicy resource as outlined in the Kubernetes documentation (Kubernetes Native) and Calico.
| Kubernetes Native | Calico | |
| Rule Actions | Allow (implicity to the rule) | Allow, Deny, Log, Pass |
| ApiVersion | networking.k8s.io/v1 | projectcalico.org/v3 |
| Kind | NetworkPolicy | NetworkPolicy |
| Resource Type | namespaced | namespaced |
| Policy rules evaluation | Union of all applying policies’ rules | Order |
| Selector | podSelector [matchLabels] | selector, serviceAccountSelector [match operators || logical operators] |
| Types | [ Ingress | Egress ] | [ Ingress | Egress ] |
| Performance Hints | – | AssumeNeededOnEveryNode |
Calico provides a comprehensive set of specifications for rules, offering a more granular and precise method to identify traffic. This empowers administrators with increased control over network traffic within the Kubernetes cluster.
In the tables below, you can see the options for matching traffic provided by both Kubernetes and Calico to understand the differences.
Native Kubernetes NetworkPolicy
| Kubernetes Native Ingress Rules | Kubernetes Native Egress Rules | ||
| – from | ipBlock (allow exceptions) | – to | ipBlock (allow exceptions) |
| namespaceSelector [namespaceSelector | matchExpressions] | namespaceSelector [namespaceSelector | matchExpressions] | ||
| podSelector (matching labels) | podSelector (matching labels) | ||
| – ports | – protocols [TCP | UDP | SCTP*] – ports [port | port:endPort] |
– ports | – protocols [TCP | UDP | SCTP*] – ports [port | port:endPort] |
Calico NetworkPolicy
| Calico Ingress Rules | Calico Egress Rules | ||
| – action | Allow, Deny, Log, Pass | – action | Allow, Deny, Log, Pass |
| – metadata | annotations | – metadata | annotations |
| – protocol | [ TCP | UDP | ICMP | ICMPv6 | SCTP | UDPLite | 1-255 ] | – protocol | [ TCP | UDP | ICMP | ICMPv6 | SCTP | UDPLite | 1-255 ] |
| – notProtocol | [ TCP | UDP | ICMP | ICMPv6 | SCTP | UDPLite | 1-255 ] | – notProtocol | [ TCP | UDP | ICMP | ICMPv6 | SCTP | UDPLite | 1-255 ] |
| – icmp | – type [0-254] – code [0-255] |
– icmp | – type [0-254] – code [0-255] |
| – notIcmp | – type [0-254] – code [0-255] |
– notIcmp | – type [0-254] – code [0-255] |
| – ipVersion | [ 4 | 6 ] | – ipVersion | [ 4 | 6 ] |
| – source | – nets [IPv4 / IPV6 list of CIDRs] – noNets [IPv4 / IPV6 list of CIDRs] – selector [match operators || logical operators] – notSelector [match operators || logical operators] – namespaceSelector [match operators || logical operators] – ports [ port | start:end | named-port (string) ] – notPorts [ port | start:end | named-port (string) ] – serviceAccounts [ name(s) (list) | match operators || logical operators] – services [ name:namespace] |
– source | – nets [IPv4 / IPV6 list of CIDRs] – noNets [IPv4 / IPV6 list of CIDRs] – selector [match operators || logical operators] – notSelector [match operators || logical operators] – namespaceSelector [match operators || logical operators] – ports [ port | start:end | named-port (string) ] – notPorts [ port | start:end | named-port (string) ] – serviceAccounts [ name(s) (list) | match operators || logical operators] – services [ name:namespace] |
| – destination | – nets [IPv4 / IPV6 list of CIDRs] – noNets [IPv4 / IPV6 list of CIDRs] – selector [match operators || logical operators] – notSelector [match operators || logical operators] – namespaceSelector [match operators || logical operators] – ports [ port | start:end | named-port (string) ] – notPorts [ port | start:end | named-port (string) ] – serviceAccounts [ name(s) (list) | match operators || logical operators] – services [ name:namespace] |
– destination | – nets [IPv4 / IPV6 list of CIDRs] – noNets [IPv4 / IPV6 list of CIDRs] – selector [match operators || logical operators] – notSelector [match operators || logical operators] – namespaceSelector [match operators || logical operators] – ports [ port | start:end | named-port (string) ] – notPorts [ port | start:end | named-port (string) ] – serviceAccounts [ name(s) (list) | match operators || logical operators] – services [ name:namespace] |
Understanding Calico policy resources
Calico Open Source uses Custom Resource Definitions (CRDs) to extend Kubernetes’ native resource model to provide additional functionality for networking and network security. Calico implements several CRDs to enhance its capabilities within Kubernetes clusters. When Calico is installed, numerous CRDs are generated, but our attention will be directed towards those specifically associated with access control. Some of the essential custom resource definitions present in Calico for this purpose are:
- NetworkPolicy: Allows users to define network policies that specify how traffic should flow between pods and other endpoints within the cluster. Network policies enable fine-grained control over network traffic, allowing administrators to enforce security policies and segmentation.
- GlobalNetworkPolicy: Enables users to define network policies that apply globally across all namespaces in the cluster. This provides centralized policy management and enforcement, simplifying network security configuration.
- NetworkSet: Allows users to define groups of IP addresses or CIDR ranges. These groups can then be used in network policies to simplify the management of IP-based access controls.
- GlobalNetworkSet: Facilitate users to define groups of IP addresses and CIDR ranges that can be used in global network policies. This provides flexibility in defining policy rules based on IP address ranges without having to specify individual IP addresses.
- HostEndpoint: Represents the network interfaces on the underlying hosts where containers and virtual machines are running. Policies can be applied to host endpoints to control traffic to and from these interfaces, enhancing network security at the host level.
To begin, let’s examine each of these CRDs closely, providing some instances of how they can be applied. Then, we will merge our knowledge and utilize it to safeguard an application.
NetworkPolicy resource
NetworkPolicy is a key resource for defining and enforcing network security policies within Kubernetes clusters. It represents an ordered set of rules, which are applied to a collection of endpoints that match a label selector.
NetworkPolicy is a namespaced resource. A NetworkPolicy resource only applies to workload endpoint resources within the namespace it’s created in. Two resources are in the same namespace if they have the same namespace value set.
NetworkPolicy resources can be used to define network connectivity rules between groups of Calico endpoints and host endpoints.
Global network policy
A global network policy resource (GlobalNetworkPolicy) represents an ordered set of rules, which are applied to a collection of endpoints that match a label selector.
GlobalNetworkPolicy is not a namespaced resource. GlobalNetworkPolicy applies to workload endpoint resources in all namespaces, and to host endpoint resources. Select a namespace in a GlobalNetworkPolicy in the standard selector by using projectcalico.org/namespace as the label name and a namespace name as the value to compare against, e.g., projectcalico.org/namespace == “default”. See network policy resource for namespaced network policy.
GlobalNetworkPolicy resources can be used to define network connectivity rules between groups of Calico endpoints and host endpoints.
Network set
A network set resource (NetworkSet) represents an arbitrary set of IP subnetworks/CIDRs, allowing it to be matched by Calico policy. Network sets are useful for applying policy to traffic coming from (or going to) external, non-Calico, networks.
NetworkSet is a namespaced resource. NetworkSets in a specific namespace only applies to network policies in that namespace. Two resources are in the same namespace if the namespace value is set the same on both. (See GlobalNetworkSet for non-namespaced network sets.)
The metadata for each network set includes a set of labels. When Calico is calculating the set of IPs that should match a source/destination selector within a network policy rule, it includes the CIDRs from any network sets that match the selector.
Global network set
A global network set resource (GlobalNetworkSet) represents an arbitrary set of IP subnetworks/CIDRs, allowing it to be matched by Calico policy. Network sets are useful for applying policy to traffic coming from (or going to) external, non-Calico, networks.
The metadata for each network set includes a set of labels. When Calico is calculating the set of IPs that should match a source/destination selector within a global network policy rule, or within a network policy rule whose namespaceSelector includes global(), it includes the CIDRs from any network sets that match the selector.
Host endpoint
A HostEndpoint is a resource that represents the interfaces attached to a host running Calico, whether those interfaces are physical or virtual. It enforces Calico policies on incoming and outgoing traffic in the host’s default network namespace using these interfaces.
You can configure a host endpoint for a specific real interface by setting interfaceName: <name-of-that-interface>, such as interfaceName: eth0. Alternatively, you can leave interfaceName empty and include one of the interface’s IP addresses in expectedIPs.
If a host endpoint is created without an accompanying network policy, Calico defaults to denying traffic to and from that endpoint, except for traffic allowed by failsafe rules. For a named host endpoint (one that represents a specific interface), Calico blocks traffic only to and from the specified interface. Traffic to and from other interfaces is not affected.
Additionally, traffic from a host to its workload endpoints (such as Kubernetes pods) is always allowed, regardless of any policies in place. This ensures that kubelet liveness and readiness probes function correctly.
Example Application
To illustrate how to use Calico network policies, we will work with the Cat Facts application. The Cat Facts application consists of three pods, each containing one container:
- worker: This microservice connects to two APIs: dog.ceo and catfact.ninja every 15 seconds. It retrieves a URL of a dog image from the dog.ceo API and a fact about cats from the catfact.ninja API. It then stores this information in the database (db). Additionally, the worker probes the HTTP connection to the microservice (facts) to ensure it is still alive.
- db: This is a MySQL database that stores the dog image URL and the cat fact information. It serves this data to the facts microservice.
- facts: The FACTS microservice acts as the frontend of the application. It listens on port 80 for HTTP GET requests and returns an HTML page displaying both a cat fact and a dog picture retrieved from the database. A new cat fact and dog picture are displayed every time a GET request is made.
The diagram below shows how the application works on a high-level.
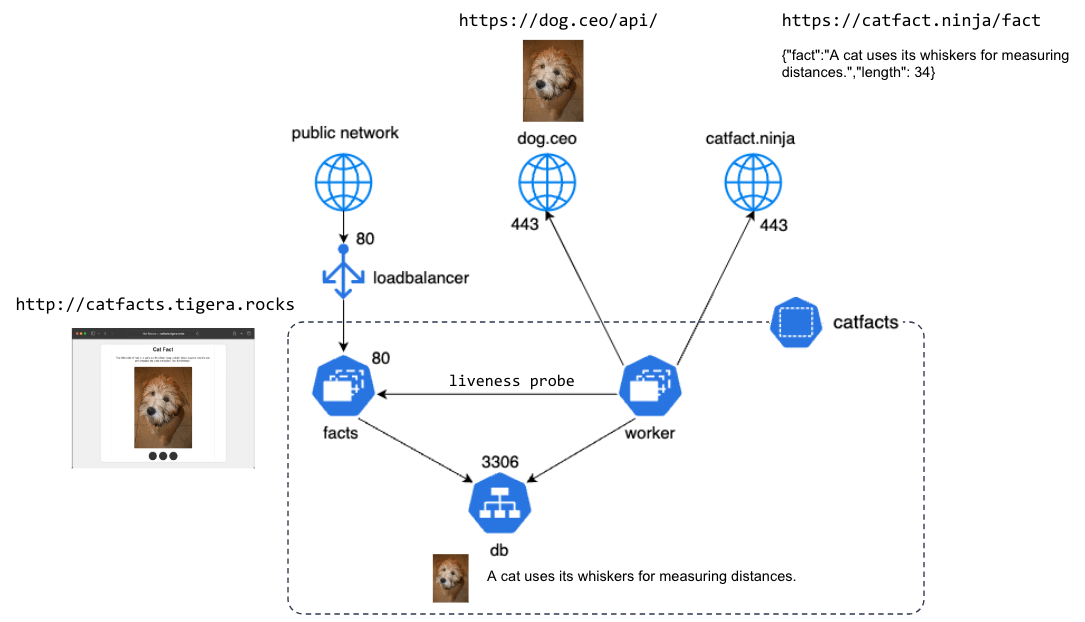
Once the application is ready, we can proceed with executing a few traditional situations and gaining knowledge on how to apply them with the help of Calico OS network policies resources.
Use Case 1- Namespace Isolation
Namespace isolation is an important practice in Kubernetes for several reasons, particularly for applications running in a Kubernetes cluster. Here are the key benefits:
- Security: Namespace isolation helps enforce security boundaries between different applications or components within the cluster. By isolating network traffic, you can prevent unauthorized access and reduce the risk of malicious activities spreading across the cluster. This is especially important if different teams or applications share the same cluster.
- Access Control: Network policies can be applied at the namespace level to control which pods can communicate with each other and with external services. This fine-grained control allows you to implement the principle of least privilege, ensuring that pods only have access to the resources they need.
- Minimize Attack Surface: By isolating namespaces, you limit the exposure of sensitive data and services to only those pods that need access. This reduces the attack surface and makes it harder for potential attackers to move laterally within the cluster.
- Traffic Management: Namespace isolation allows better management and monitoring of network traffic. You can apply network policies to manage ingress and egress traffic for each namespace, improving overall network performance and reliability.
- Compliance: Many regulatory standards require network segmentation and isolation to protect sensitive data. Namespace isolation helps you meet these compliance requirements by ensuring that data and services are appropriately segregated.
- Operational Efficiency: Isolating namespaces helps in troubleshooting and managing network issues. If a problem arises, it’s easier to identify and resolve it within an isolated namespace without affecting other parts of the cluster.
To isolate our application namespace, it is essential to comprehend the inbound and outbound communications that are taking place. Let’s analyze each communication needed for our application to work and let’s restrict these communications to the bare minimum. This analysis will be done in two parts: a) What communication will happen inside the namespace and; b) What communication happens with endpoints outside the application namespace.
a) Communications inside the namespace:
- Egress traffic
- The pod worker is connecting to:
- The pod facts on port 80
- The pod db on port 3306
- The pod facts is connecting to pod db on port 3306
- The pod worker is connecting to:
- Ingress traffic:
- The pod facts receives a connection from pod worker on port 80
- The pod db receives a connection from:
- The pod facts on port 3306
- The pod worker on port 3306
b) Communications outside the namespace:
- Egress traffic
- The pod worker connects to APIs with public ip addresses on port 443
- Ingress traffic
- The pod facts receives connections from public ip address ont port 80
Given these requirements for our application to work, we can translate this into a policy to isolate the namespace accordingly:
apiVersion: projectcalico.org/v3
kind: NetworkPolicy
metadata:
  name: namespace-isolation-catfacts
  namespace: catfacts
spec:
  selector: projectcalico.org/namespace == 'catfacts'
  serviceAccountSelector: ''
  ingress:
    - action: Allow
      protocol: TCP
      source:
        namespaceSelector: projectcalico.org/name == 'catfacts'
      destination:
        ports:
          - '80'
          - '3306'
    - action: Allow
      protocol: TCP
      source:
        notNets:
          - 192.168.0.0/16
      destination:
        ports:
          - '80'
  egress:
    - action: Allow
      protocol: TCP
      source: {}
      destination:
        ports:
          - '443'
    - action: Allow
      protocol: TCP
      source: {}
      destination:
        namespaceSelector: projectcalico.org/name == 'catfacts'
        ports:
          - '80'
          - '3306'
    - action: Allow
      protocol: UDP
      source: {}
      destination:
        namespaceSelector: projectcalico.org/name == 'kube-system'
        ports:
          - '53'
  types:
    - Egress
    - Ingress
EOF
This NetworkPolicy is designed to control both incoming and outgoing network traffic for all pods within the catfacts namespace. This policy ensures that only specific types of traffic are allowed, enhancing the security and isolation of the namespace.
For incoming traffic (ingress), the policy permits TCP traffic to ports 80 and 3306, but only if the source of this traffic is from within the catfacts namespace itself. Additionally, it allows TCP traffic to port 80 from any source that is outside the IP range 192.168.0.0/16. This effectively prevents incoming traffic from within the pod network from accessing port 80, disallowing other pods in the same node to access locally the application.
For outgoing traffic (egress), the policy permits all TCP traffic to port 443, allowing pods in the catfacts namespace to communicate with external APIs services. It also allows TCP traffic to ports 80 and 3306, but restricts this to destinations within the catfacts namespace, ensuring internal communication between pods on these ports is allowed. Furthermore, the policy allows UDP traffic to port 53 within the kube-system namespace, enabling necessary DNS resolution services for the pods.
By defining these specific rules, the NetworkPolicy ensures that the catfacts namespace is effectively isolated, allowing only the desired and necessary network traffic to flow in and out. This setup not only enhances security but also ensures controlled access, preventing unwanted or potentially harmful traffic from reaching the pods in the namespace.
Use Case 2 – Workload microsegmentation
Workload microsegmentation in Kubernetes offers numerous benefits, particularly in enhancing security, compliance, and operational efficiency. Here are some key advantages:
- Enhanced Security: Provides granular control and isolation, reducing the attack surface and preventing lateral movement within the cluster by enforcing least privilege and zero-trust security models.
- Regulatory Compliance: Ensures adherence to regulatory requirements and provides audit trails through detailed logging and monitoring of network traffic.
- Operational Efficiency: Simplifies network management with policy-driven approaches and scales effectively in dynamic Kubernetes environments, improving performance and reducing latency.
- Flexibility and Integration: Supports hybrid and multi-cloud deployments with consistent network policies and integrates seamlessly with existing Kubernetes tools and CI/CD pipelines.
- Improved Visibility: Offers comprehensive network visibility, real-time monitoring, and alerting, aiding in understanding application dependencies, traffic flows, and troubleshooting.
For a workload microsegmentation scenario, a global default deny policy ensures that unwanted traffic (ingress and egress) is denied by default. Pods without a policy (or with an incorrect policy) are not allowed traffic until the appropriate network policy is defined. A global deny policy helps mitigate other lateral malicious attacks.
We recommend creating a global default deny policy after have completed writing the policy for the traffic you want to allow. Let’s start by creating one policy per workload:
1) facts:
apiVersion: projectcalico.org/v3
kind: NetworkPolicy
metadata:
  name: facts
  namespace: catfacts
spec:
  selector: app == "facts"
  ingress:
    - action: Allow
      protocol: TCP
      source:
        notNets:
          - 192.168.0.0/16
      destination:
        ports:
          - '80'
    - action: Allow
      protocol: TCP
      source:
        selector: app == "worker"
      destination:
        ports:
          - '80'
  egress:
    - action: Allow
      protocol: TCP
      source: {}
      destination:
        selector: app == "db"
        ports:
          - '3306'
  types:
    - Ingress
    - Egress
For ingress rules, the policy allows TCP traffic to port 80 from sources outside the IP range 192.168.0.0/16, effectively blocking incoming traffic from within this range. The rule intents to block any workload on the same cluster to connect to the application locally. Additionally, it permits TCP traffic to port 80 from pods labeled app == “worker”, facilitating communication between worker pod and facts pod on port 80.
In terms of egress rules, the policy permits TCP traffic to port 3306 to pods labeled app == “db”, enabling facts pod to communicate with database pod, to retrieve the information to craft the webpage.
2) db:
apiVersion: projectcalico.org/v3
kind: NetworkPolicy
metadata:
  name: db
  namespace: catfacts
spec:
  selector: app == "db"
  ingress:
    - action: Allow
      protocol: TCP
      source:
        selector: app == "facts" || app == "worker"
      destination:
        ports:
          - '3306'
  types:
    - Ingress
This NetworkPolicy is designed to manage incoming network traffic for pods labeled app == “db” within the catfacts namespace. The policy applies specifically to these database pods, ensuring they receive only allowed traffic.
The policy’s ingress rule allows TCP traffic to port 3306, from any source pod that has either the app == “facts” or app == “worker” label. This means that only pods labeled as “facts” or “worker” are permitted to establish a TCP connection to port 3306 on the database pods.
Additionally, the policy specifies that it only governs ingress traffic, meaning it is solely concerned with controlling the incoming connections to the db pods. This setup ensures that the database pods within the catfacts namespace can only be accessed on port 3306 by designated pods, enhancing the security and proper functioning of the database service.
3) worker
apiVersion: projectcalico.org/v3
kind: NetworkPolicy
metadata:
  name: worker
  namespace: catfacts
spec:
  selector: app == "worker"
  egress:
    - action: Allow
      protocol: TCP
      source: {}
      destination:
        ports:
          - '443'
    - action: Allow
      protocol: TCP
      source: {}
      destination:
        selector: app == "db"
        ports:
          - '3306'
    - action: Allow
      protocol: TCP
      source: {}
      destination:
        selector: app == "facts"
        ports:
          - '80'
  types:
    - Egress
This NetworkPolicy is designed to manage outgoing network traffic for pods labeled app == "worker" within the catfacts namespace. The policy applies specifically to these worker pods, defining the allowed destinations for their outgoing connections.
The policy includes several egress rules. The first rule allows TCP traffic to port 443, to any destination. This permits the worker pod to connect to the APIs with a public IP. The second rule allows TCP traffic to port 3306 to any pod labeled app == "db", enabling the worker pod to communicate with the database pod. The third rule permits TCP traffic to port 80 to any pod labeled app == "facts", allowing the worker pods to connect to the facts pods.
Additionally, the policy specifies that it only governs egress traffic, meaning it is solely concerned with controlling the outgoing connections from the worker pod, as no service is available to be consumed at the worker pod. This setup ensures that the worker pods within the catfacts namespace can make necessary and secure connections to web services, databases, and facts pods, thereby enhancing the functionality and security of the worker pods’ operations.
With all these rules you can greatly restrict the connections that can happen between the worker pod and others endpoints. However, opening access to any host at the internet on port 443 may raise some concerns. Ideally, the only IP addresses allowed should be the APIs one. For now there are only two APIs: dog.ceo and catfacts.ninja. You have to options for restricting the IP addresses allowed for for connection. The first is adding these IP addresses in the policy itself:
egress:
    - action: Allow
      protocol: TCP
      source: {}
      destination:
        nets:
          - 172.64.80.1/32    # dog.ceo api ip address
          - 104.131.8.184/32  # catfact.ninja api ip address
        ports:
          - '443'
A better alternative, especially if you have many other network policies that needs to allow APIs is to create a NetworkSet with the IPs and refer it into the network policy.
A NetworkSet for the allowed-apis would look like the following:
kind: GlobalNetworkSet
apiVersion: projectcalico.org/v3
kind: GlobalNetworkSet
metadata:
  name: allowed-apis
  labels:
    allowed-apis: 'true'
spec:
  nets:
    - 172.64.80.1/32
    - 104.131.8.184/32
To refer to the NetworkSet from the network policy rule, use a selector as destination. Also, because it makes sense to reuse the NetworkSet on a Cluster level, we created it as a GlobalNetworkSet and we are also modifying the network policy to a global network policy. See the final version of the global network policy for the worker pod:
kubectl apply -f - <<-EOF
apiVersion: projectcalico.org/v3
kind: GlobalNetworkPolicy
metadata:
  name: worker
spec:
  selector: app == "worker"
  namespaceSelector: kubernetes.io/metadata.name == "catfacts"
  egress:
    - action: Allow
      protocol: TCP
      source: {}
      destination:
        selector: allowed-apis == "true"
        ports:
          - '443'
    - action: Allow
      protocol: TCP
      source: {}
      destination:
        selector: app == "db"
        ports:
          - '3306'
    - action: Allow
      protocol: TCP
      source: {}
      destination:
        selector: app == "facts"
        ports:
          - '80'
  types:
    - Egress
Even though this is a global network policy, by using the namespaceSelector, we are choosing to affect only the catfacts namespace.
And finally, let’s create the default-deny global network policy to lockdown all not-allowed connections from and to our application pods.
kubectl apply -f - <<-EOF
apiVersion: projectcalico.org/v3
kind: GlobalNetworkPolicy
metadata:
  name: default-deny
spec:
  selector: ''
  namespaceSelector: kubernetes.io/metadata.name == "catfacts"
  types:
    - Ingress
    - Egress
EOF
Now the microsegmentation is completed and our application is secure.
Best practices for using Calico policies
This section provides best practices for using Calico policies. It covers topics such as starting with a default deny policy, using the least privilege principle, using label selectors, using Calico policy annotations, and using Calico policy templates.
Start with a default deny policy
A default deny policy is the most secure option because it blocks all traffic by default. This means that you must explicitly allow any traffic that you want to pass through. This is the most secure option because it ensures that no unauthorized traffic can pass through your network.
Use the least privilege principle
The least privilege principle states that each user should only have the permissions that they need to do their job. This means that you should only allow traffic that is necessary for the user to perform their tasks. This helps to reduce the risk of unauthorized access to your network.
Use label selectors
Label selectors allow you to target specific pods or services with your Calico policies. This can be useful for creating more granular policies that only apply to specific workloads. For example, you could create a policy that only allows traffic from the web server pods to the database pods.
Use Calico policy templates
Calico policy templates allow you to create reusable policy definitions. This can be useful for creating consistent policies across your organization. For example, you could create a policy template for all of your web servers that includes the same set of rules.
Benefits of using Calico’s Network Policy
Calico’s Network Policy offers a plethora of advantages that make it an invaluable tool for network management within Kubernetes clusters.
First and foremost, Calico’s Network Policy simplifies network policy management by providing a consistent and intuitive interface for creating, managing, and enforcing network policies. This enables network administrators to easily define and implement network security policies without the need for complex configurations or specialized expertise.
Furthermore, Calico’s Network Policy provides granular control over network traffic, allowing administrators to define precise rules for allowing or denying traffic based on various criteria such as pod labels, IP addresses, and ports. This level of control empowers administrators to implement sophisticated security measures and enforce network segmentation, ensuring that sensitive data and services remain protected.
Calico’s Network Policy also offers flexibility and extensibility, enabling administrators to adapt network policies to meet the evolving needs of their applications and infrastructure. Through the use of policy templates and annotations, administrators can easily customize and extend network policies to address specific requirements or integrate with external systems.
Moreover, Calico’s Network Policy seamlessly integrates with Kubernetes, leveraging its native constructs and APIs. This integration ensures that network policies are tightly coupled with the Kubernetes ecosystem, simplifying policy management and enhancing overall operational efficiency.
Last but not least, Calico’s Network Policy strengthens security and compliance by providing robust mechanisms for enforcing network security policies. By leveraging Calico’s Network Policy, organizations can effectively mitigate security risks, meet regulatory compliance requirements, and safeguard sensitive data within their Kubernetes clusters.
Conclusion
Calico policies are a powerful tool for securing and controlling network traffic in Kubernetes clusters. They provide a comprehensive set of features for enforcing network security, including the ability to restrict egress traffic, allow ingress traffic, enforce deny-all policies, and route traffic. Calico policies can also be used to target specific pods or services with labels and annotations, and to optimize network performance and availability with advanced traffic routing rules.
In this blog post, we have provided a comprehensive overview of Calico policies for Calico OS users. We have covered the basics of Calico policies, including what they are, how they work, and how to use them. We have also provided best practices for using Calico policies and examples of how they can be used in real-world scenarios.
By following the instructions in this blog post, you will be able to create and use Calico policies to secure and control network traffic in your Kubernetes clusters. Calico policies can help you improve the security, performance, and availability of your Kubernetes applications and services.
Get started with Calico network policy


Join our mailing list
Get updates on blog posts, workshops, certification programs, new releases, and more!