










Kubernetes adoption is growing, and managing secure and efficient network communication is becoming increasingly complex. With this growth, organizations need to enforce network policies with greater precision and care. However, implementing these policies without disrupting operations can be challenging.
That’s where Calico Whisker comes in. It helps teams implement network policies that follow the principle of least privilege, ensuring workloads communicate only as intended. Since most organizations introduce network policies after applications are already running, safe and incremental rollout is essential.
To support this, Calico Whisker offers staged network policies, which allow teams to preview a policy’s effect in a live environment before enforcing it. Alongside this, policy traces in Calico Whisker provide deep visibility into how both enforced and pending policies impact traffic. This makes it easier to understand policy behaviour, validate intent, and troubleshoot issues in real time. In this post, we’ll walk through real-world policy trace outputs and show how they help teams confidently deploy and refine network policies in production Kubernetes clusters.
Kubernetes Network Policy Behaviour
It’s important to reiterate the network policy behaviour in Kubernetes, as understanding this foundation is key to effectively interpreting policy traces and ensuring the right traffic flow decisions are made.
Default Behaviour
- Allow All: All pods can communicate with each other, with no restrictions—essentially, an implicit ‘allow everything.’
Once a NetworkPolicy selects a pod and applies rules, the behaviour changes:
- Ingress Isolation: No incoming traffic is allowed unless explicitly permitted by a policy.
- Egress Isolation: No outgoing traffic is allowed unless explicitly permitted by a policy.
In short, the default behaviour flips from ‘allow all’ to ‘deny all’ (implicitly) for the selected pod.
Flow Reporter Field
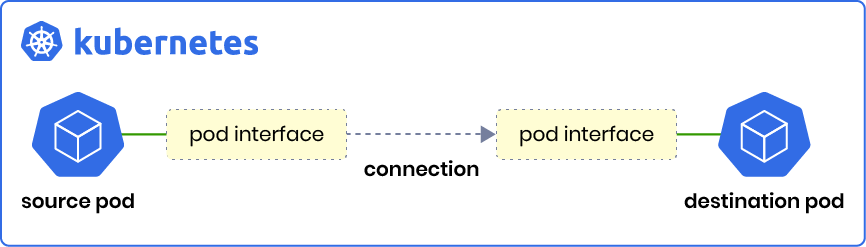
Flows can be reported by both the source and the destination. This distinction helps explain why a flow may be allowed at the source but denied at the destination, depending on how policies are applied.
Each flow log includes a reporter field that indicates which workload reported the flow:
reporter: Dst– The flow and its corresponding verdicts were reported by the destination endpoint interface.reporter: Src– The flow and its corresponding verdicts were reported by the source endpoint interface.
Policy Trace Output Examples
A policy trace in Calico Whisker is a detailed record showing how network traffic between workloads is evaluated against enforced and staged network policies. It indicates which policies matched (or did not match), the resulting verdict (allow/deny), and whether the decision came from current enforcement or pending policy changes. This output helps users understand why a flow was allowed or denied and provides visibility into how policy changes may affect traffic.
In this section, we’ll walk through example policy traces across common scenarios:
- Kubernetes Default behaviour
- Staged Allow
- Staged Deny
- Enforced Allow
- Enforced Deny
The policy trace output includes two key sections.
- Enforced Policies – Those evaluated against the flow, with verdicts (allow/deny) applied.
- Pending Policies – Staged policies with expected verdicts, or policy changes that haven’t yet applied to the current flow but will affect new connections (e.g., long-lived connections).
For a deeper dive into staging network policies and securing Kubernetes workloads, check out our companion post: Calico Whisker & Staged Network Policies. The application as well as network policy manifests can be found in this github repository.
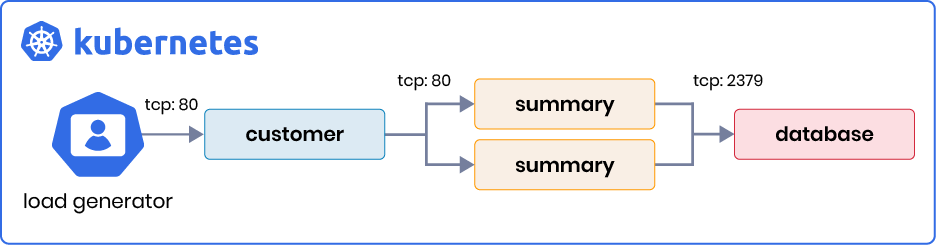
For the Calico network policy and policy trace examples discussed here, we’ll use the same three-tier web application, ‘yet-another-bank’ (yaobank), which was introduced in our previous post on Calico Whisker and Staged Network Policies. This post covers how staged network policies enable safe rollout of security policies in Kubernetes without causing downtime, ensuring a smooth transition from ‘allow all’ to more restrictive policies. The manifest for the application can be found here.
1. Kubernetes Default Behaviour
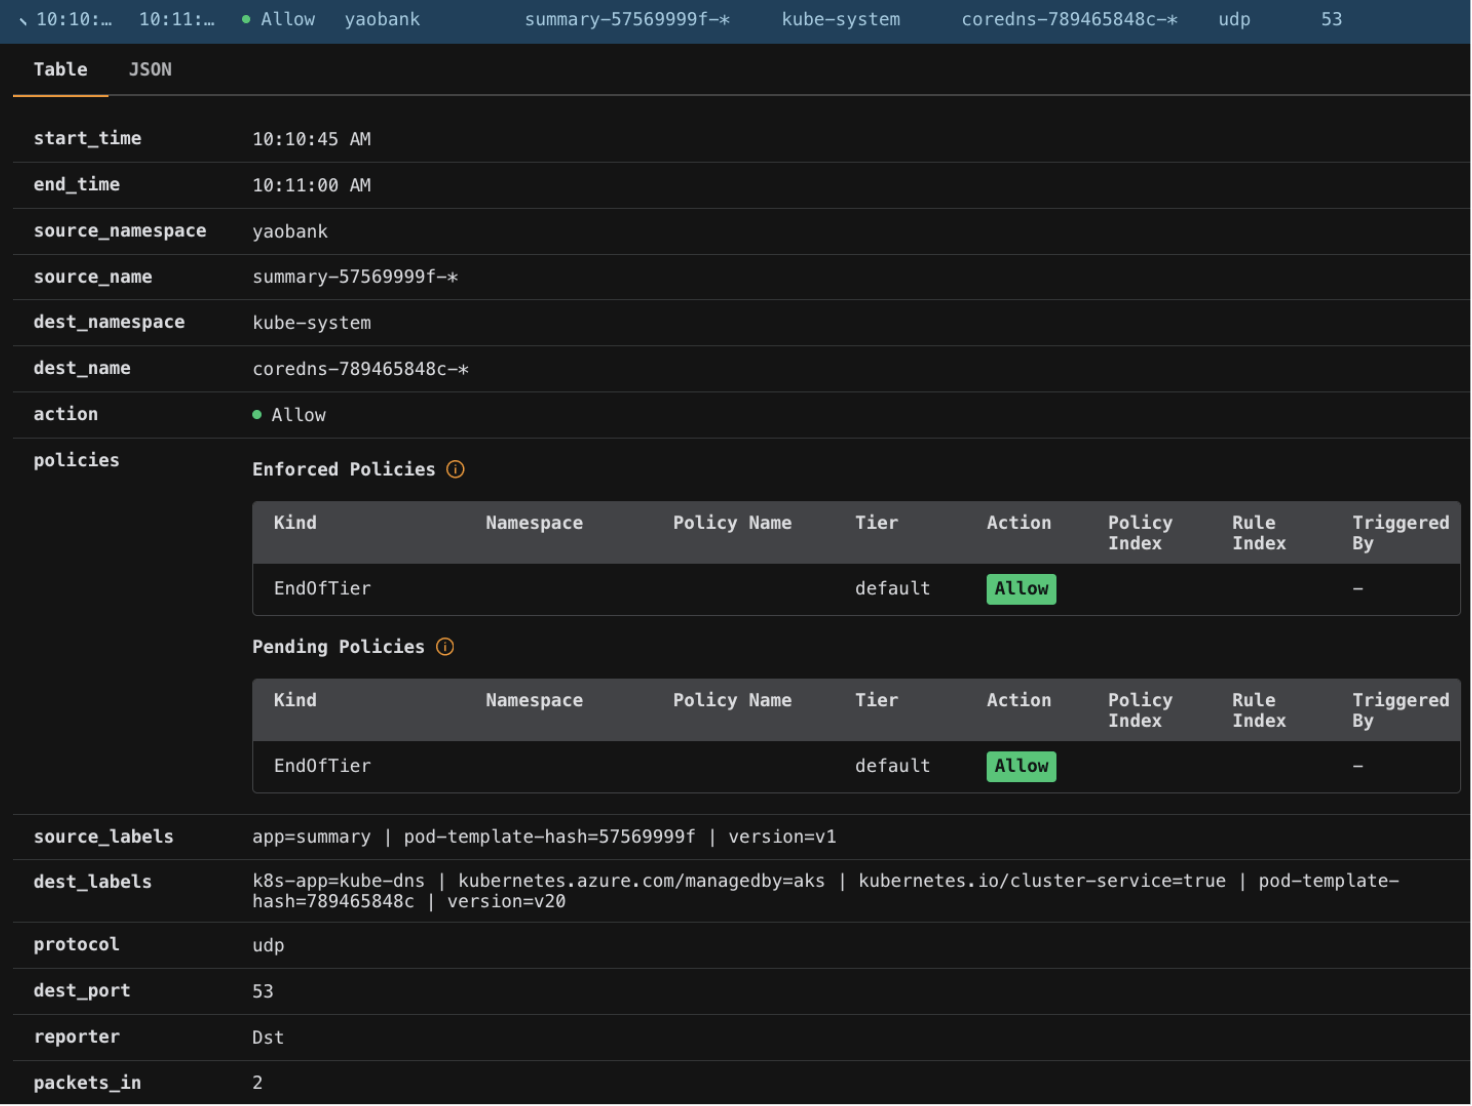
When no network policies are applied to a workload, Kubernetes allows all traffic by default. The screenshot below illustrates this behaviour, along with key details from the flow log output:
- Kind: EndOfTier – Calico evaluated all cluster policies but found none that matched the workload reporting this flow.
- Tier: default – The default tier, which is typically the final step in the policy evaluation order.
- Action: Allow – From the reporting workload’s perspective, this flow was permitted.
Here, the flow was reported by the destination (reporter: Dst), which is kube-dns. This indicates that no ingress policies were defined for kube-dns, so the traffic was allowed by Kubernetes’ default “allow all” behaviour.
2. Staged Allow
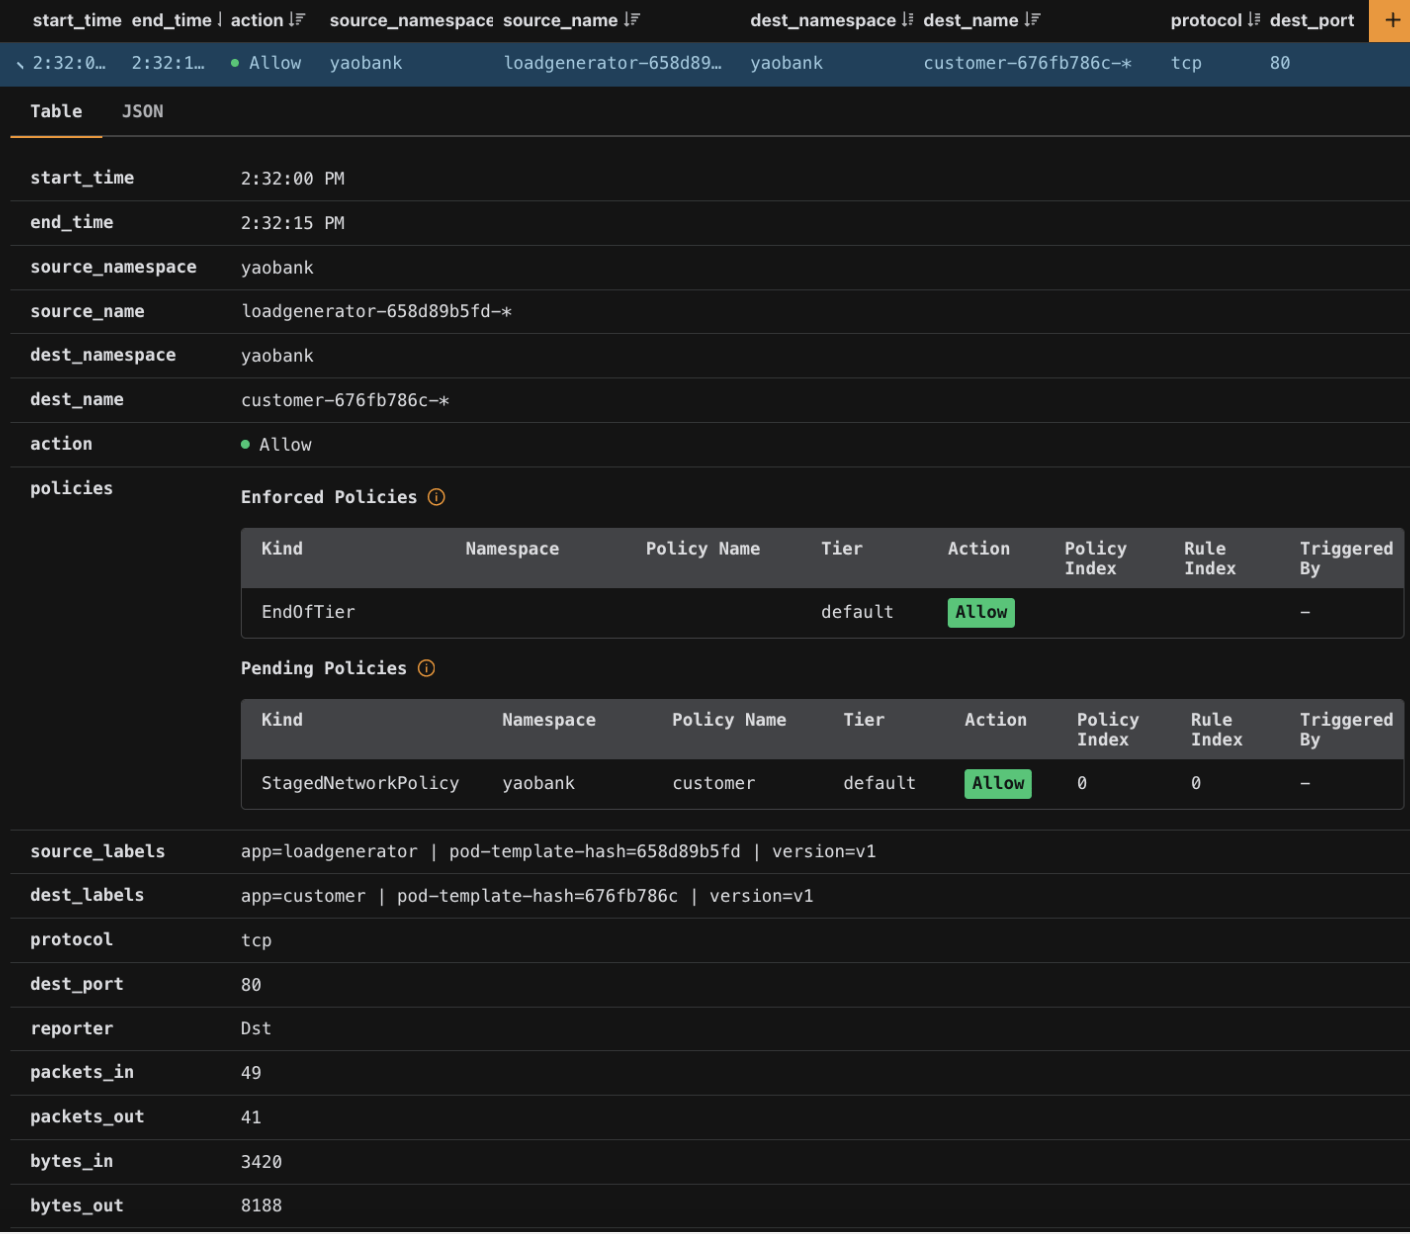
The screenshot below shows an example of a staged allow policy trace. The flow between the loadgenerator pod and the customer pod was reported by the destination (reporter: Dst).
- Enforced Policies – No enforced policies apply to the
customerendpoint. As a result, the flow was permitted by Kubernetes’ default allow behaviour. - Pending Policies – A
StagedNetworkPolicynamed customer exists in theyaobanknamespace. Its action is reported as Allow, meaning that if this policy were enforced, the flow would continue to be allowed.
The Staged Network Policy for the customer workload is shown below. We can see that the above flow was allowed by the ingress rule.
apiVersion: projectcalico.org/v3
kind: StagedNetworkPolicy
metadata:
  name: customer
  namespace: yaobank
spec:
  selector: app == 'customer'
  ingress:
    - action: Allow
      protocol: TCP
      destination:
        ports:
          - 80
  egress:
    - action: Allow
      protocol: TCP
      destination:
        selector: app == 'summary'
        ports:
          - 80
3. Staged Deny
The screenshot below shows an example of a staged deny policy trace. The flow between the summary pod and the database pod was reported by the source (reporter: Src).
- Enforced Policies – No enforced policies apply to the
summaryendpoint. As a result, the flow was permitted under Kubernetes’ default allow behaviour. - Pending Policies – We see that the action is “Deny”, and this was triggered by a
StagedNetworkPolicynamedsummaryin theyaobanknamespace, as indicated by the tooltip. However, it should be noted that this flow will not be explicitly denied by the policy (when enforced), but rather implicitly denied due to the presence of a network policy that matches thesummaryendpoint. In Calico and Kubernetes, whenever a policy rule matches a given endpoint, there is an implicit deny for any traffic not explicitly allowed.
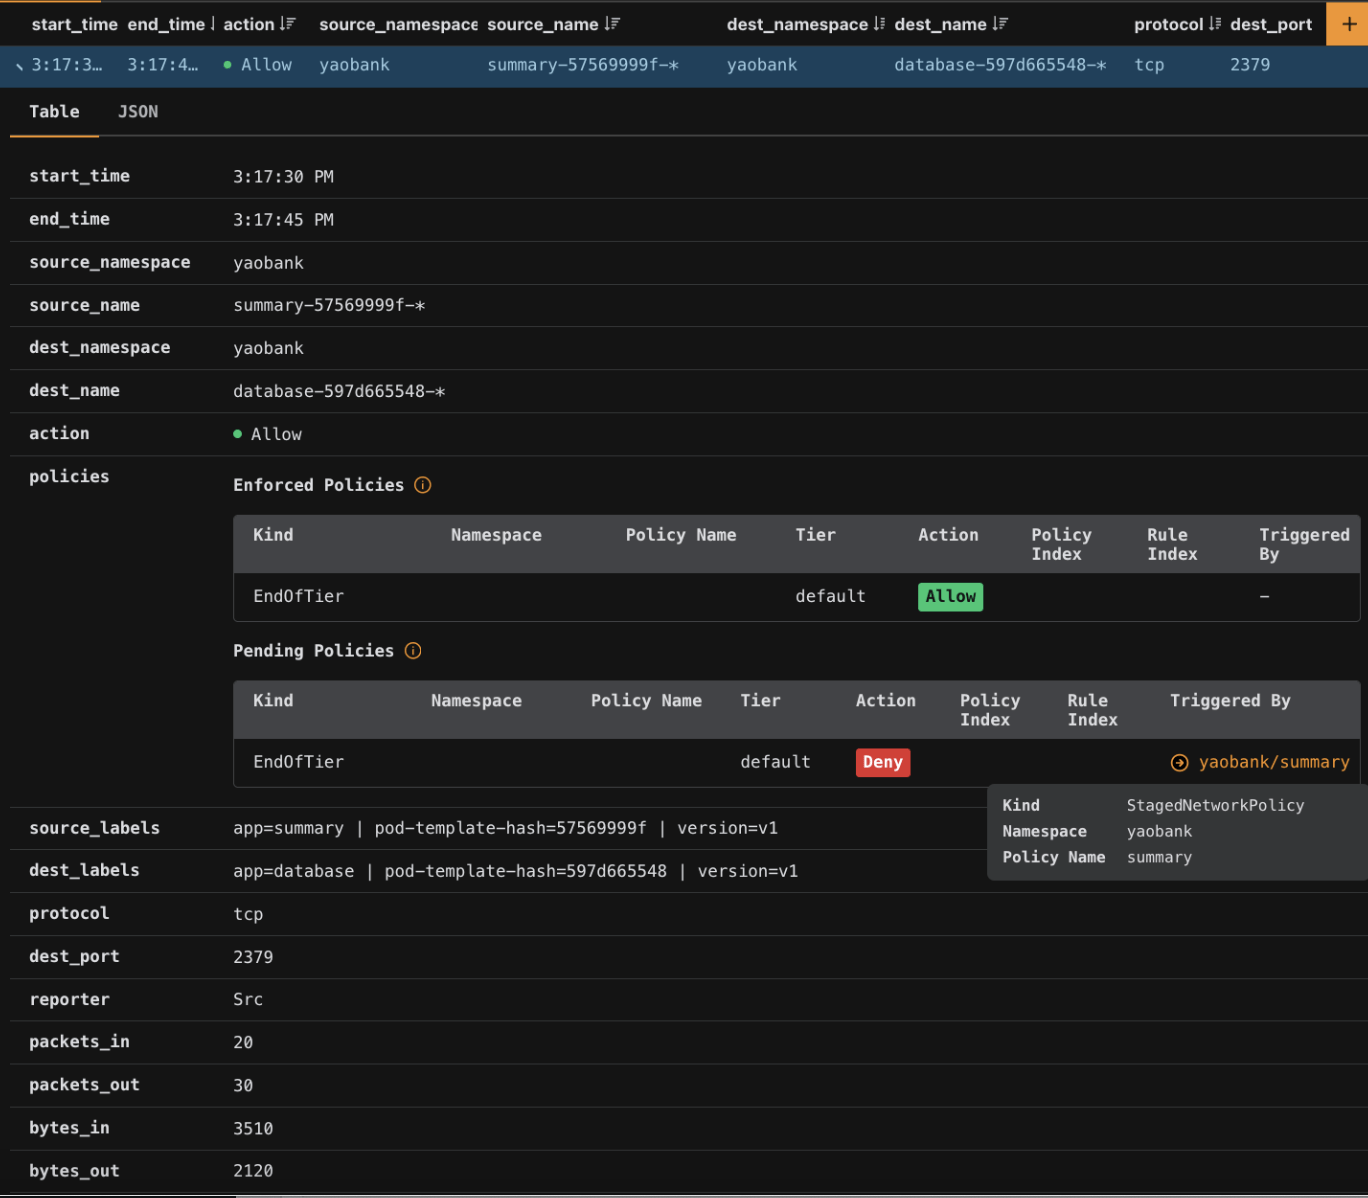
The staged network policy for the summary workload contains a typo in the ingress rule. The flow shows the destination port as 2379, but the policy allows 2279. Because of this mismatch, the flow does not match the policy rule. Since the policy still applies to the summary endpoint, Kubernetes applies an implicit deny to any traffic not explicitly allowed. This is reflected in the policy trace output by Kind: EndOfTier
apiVersion: projectcalico.org/v3
kind: StagedNetworkPolicy
metadata:
  name: summary
  namespace: yaobank
spec:
  selector: app == 'summary'
  ingress:
    - action: Allow
      protocol: TCP
      source:
        selector: app == 'customer'
      destination:
        ports:
          - 80
  egress:
    - action: Allow
      protocol: TCP
      destination:
        selector: app == 'database'
        ports:
          - 2279
Next let’s enforce the policies discussed above (StagedNetworkPolicy → NetworkPolicy) and inspect the policy traces.
4. Enforced Allow
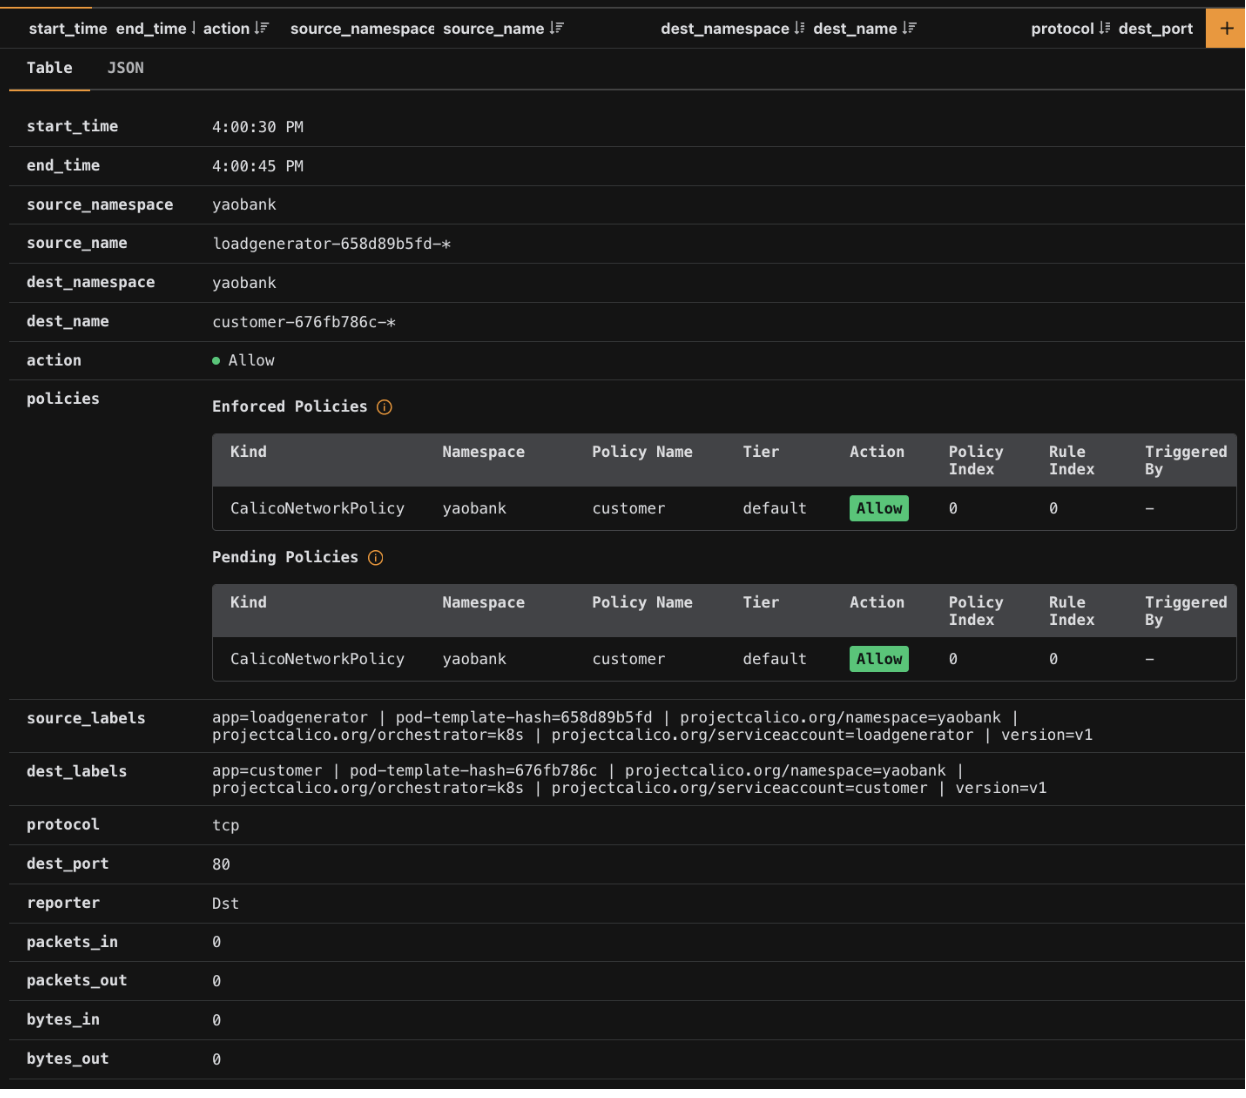
The screenshot below shows an example of an enforced allow policy trace. The flow between the loadgenerator pod and the customer pod was reported by the destination (reporter: Dst).
- Enforced Policies – The trace shows a
CalicoNetworkPolicynamedcustomerin theyaobanknamespace that explicitly allows this flow - Pending Policies – The output matches the “Enforced Policies” section, indicating there are no staged network policies or pending changes that would alter the verdict for this flow
5. Enforced Deny
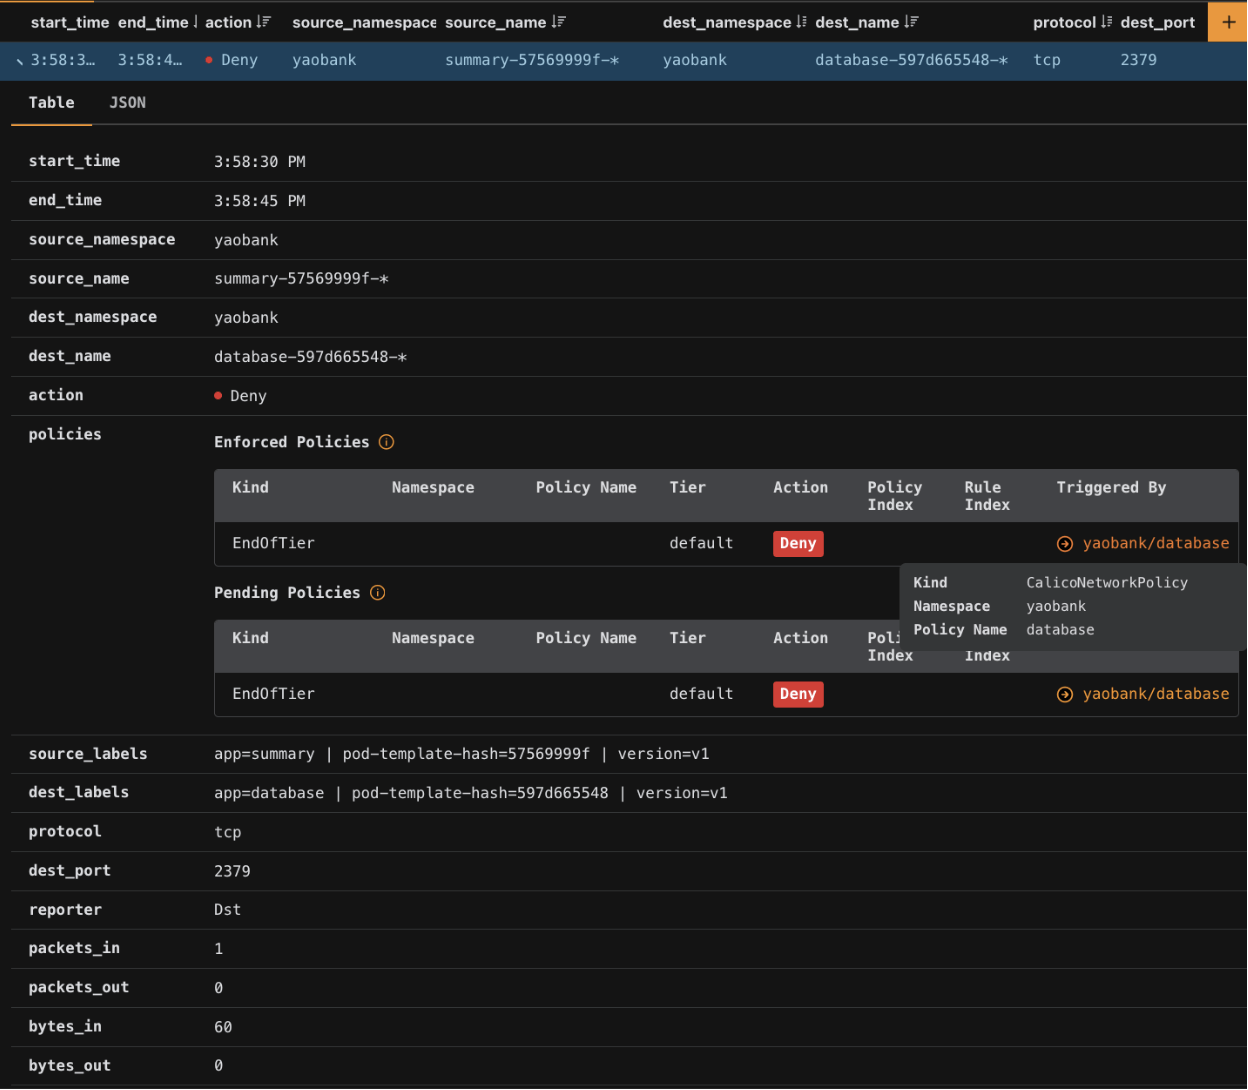
The screenshot below shows an example of an enforced deny policy trace. The flow between the summary pod and the database pod in the yaobank namespace was reported by the destination (reporter: Dst).
- Enforced Policies – The trace shows
Kind: EndOfTierin thedefaulttier, with the action set to Deny. The tooltip indicates that aCalicoNetworkPolicynamedyaobankmatched this endpoint. This means Calico evaluated all applicable policies and determined that no allow rule matched this flow, so the default verdict was to deny traffic. - Pending Policies – The section mirrors the “Enforced Policies” output, also showing Deny. This indicates there are no staged policies or pending changes that would alter the outcome for this flow.
As a result, the attempted TCP connection on port 2379 from the summary pod to the database pod was blocked by policy enforcement.
Mastering Network Policies with Calico Whisker
In this post, we explored how Calico policy traces help us understand Kubernetes’ default networking behaviour and the impact of applied or pending network policies. Using real examples of default allow, enforced allow, and enforced deny traces, we examine how flows are evaluated, which policies (if any) apply, and how verdicts are determined. We also highlight the role of staged policies in shaping future enforcement. Together, these insights show how policy traces provide visibility into why traffic is allowed or denied – making it easier to validate policy intent, troubleshoot connectivity, and strengthen cluster security.
Ready to take control of your Kubernetes security?
Try out Calico Whisker with no cluster required! And if you’re looking for more tips or have questions, join our vibrant community on the Calico Slack channel to connect with experts and fellow practitioners.